Android SMS Gateway Dual SIM Setup
In this guide, you can find information and assistance about how to setup Android SMS Gateway with Dual SIM.
What are the advantages of dual SIM phones?
- Save costs: Use two SIM cards to save money on calls and data.
- Work-Life Balance: Separate personal and work contacts.
- Privacy: Keep private and public contacts separate.
- Convenience: Manage multiple phone numbers on one device.
- Backup: Stay connected even if one SIM has issues
- More storage: Having DUAL sim means double storage
Putting two SIM cards into the Android Phone (Video Tutorial)
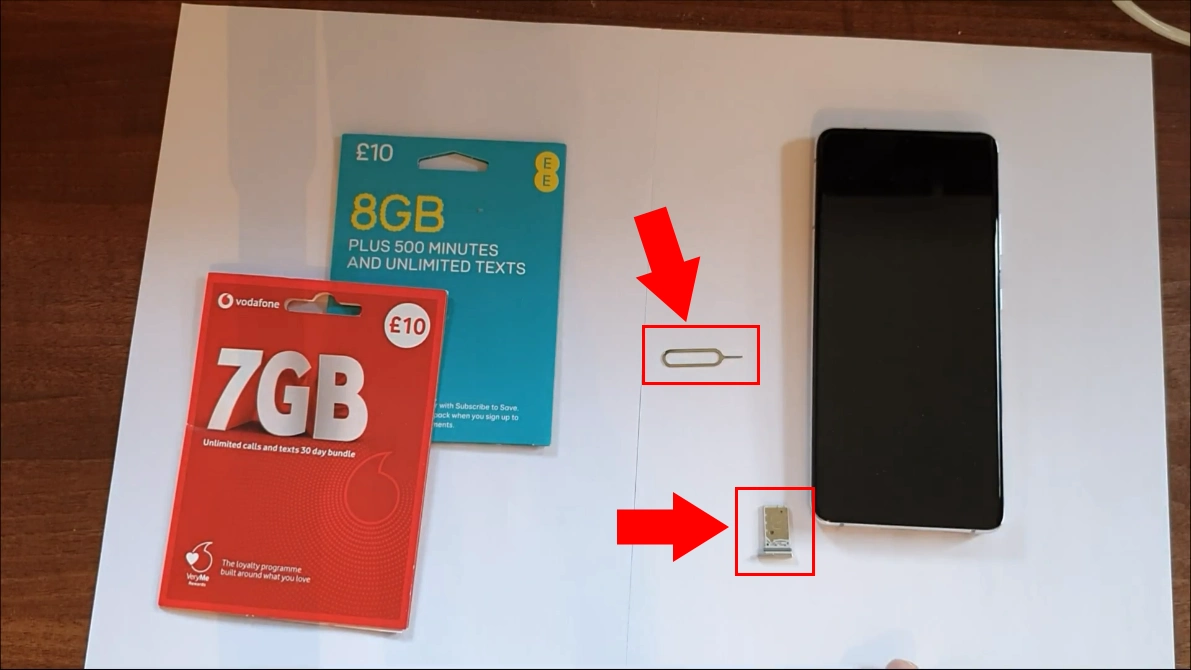
The following video explains how to put two SIM cards into your Android mobile device. You will only need your phone, the SIM card removal needle, and 2 SIM cards. The guide starts with removing the SIM tray from the phone and ends with having two SIM cards in the Android SMS Gateway (Video 1).
How to put two SIM cards into your Android phone (Quick steps)
- Remove the SIM tray from the phone
- Insert both SIM cards into the tray
- Insert the SIM tray back into your phone
- Make sure it is working properly
How to put two SIM cards into your Android phone
The first thing you need to do is remove the SIM tray from your mobile device with the needle (Figure 1).
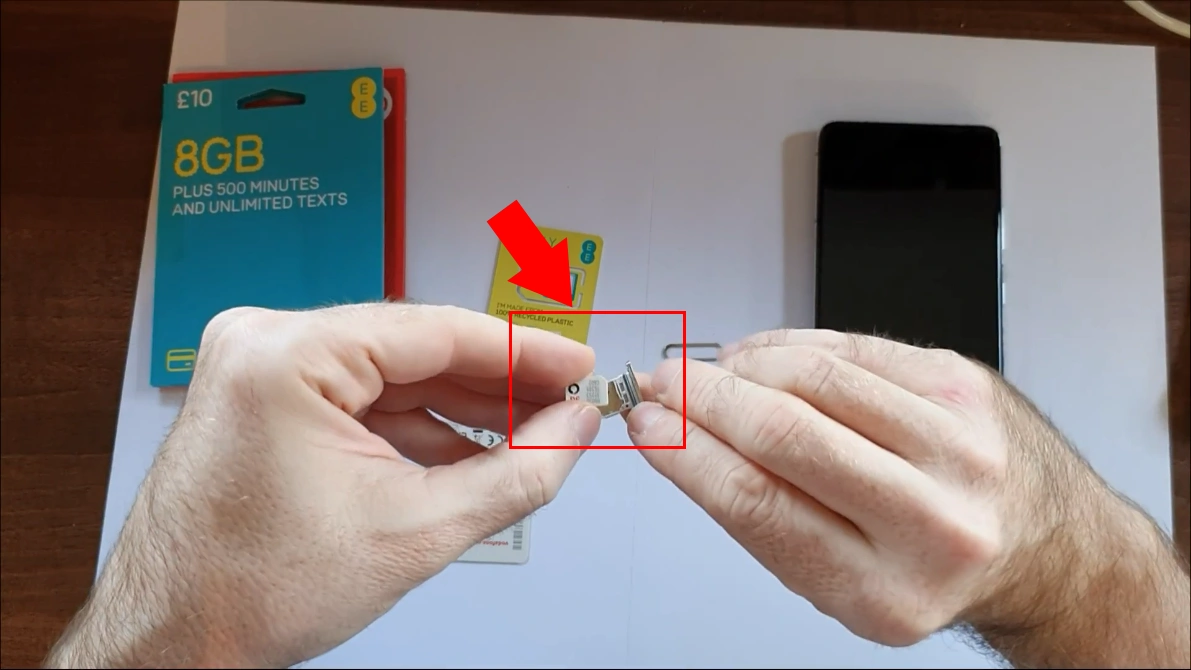
After you are successfully done with the first step, you can move along to the second one. You need to insert the SIM cards into the SIM tray as shown in the picture (Figure 2).
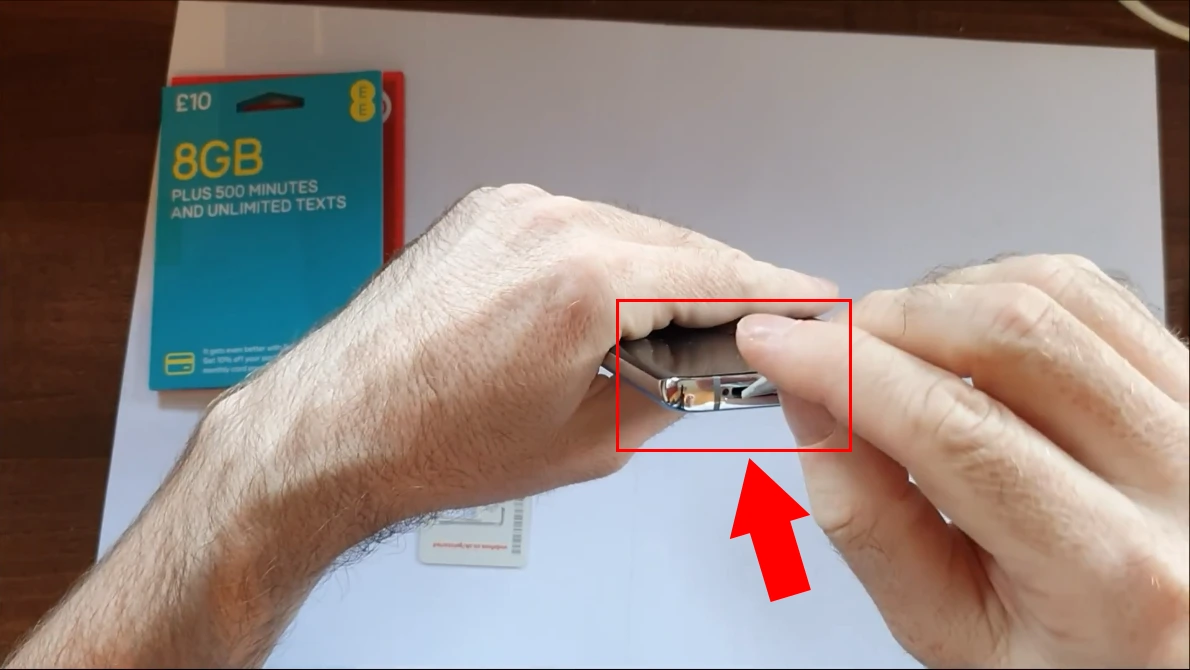
Once you have placed both SIM cards into the SIM tray, you need to insert the SIM tray back to the phone (Figure 3).
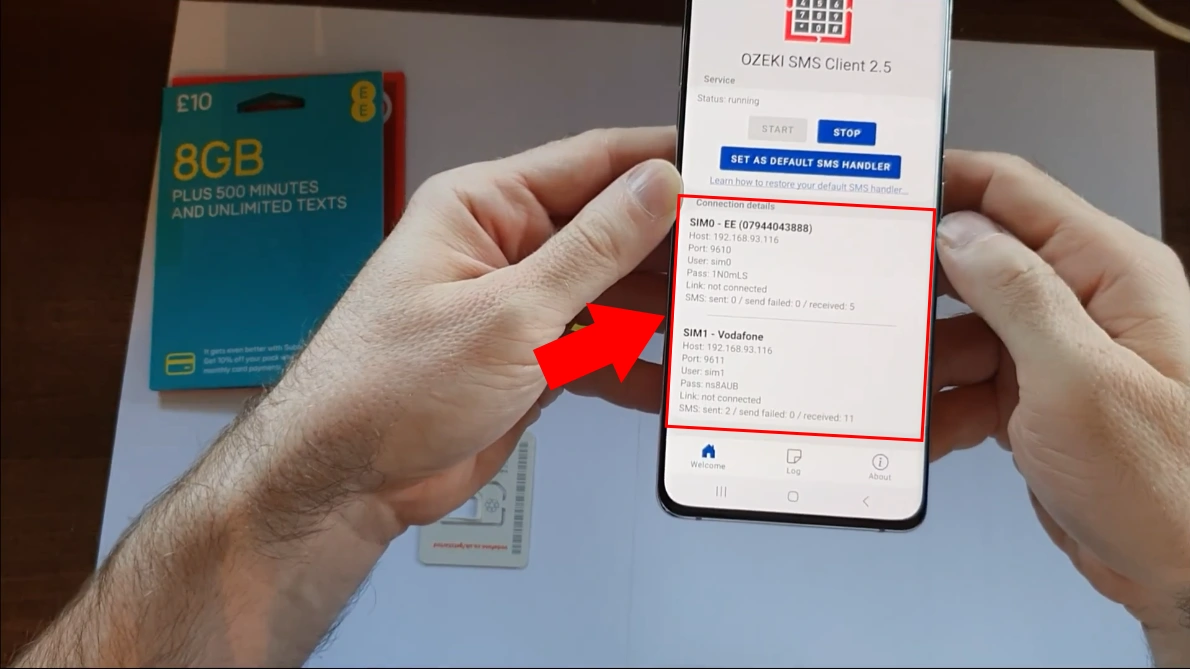
If you did everything accordingly to the guide above, you now have two SIM cards in the Ozeki Android SMS Gateway (Figure 4).
Install Ozeki Android SMS Gateway on the Phone
Installing Ozeki Android SMS Gateway (Quick Steps)- Browse android-sms-gateway.com/
- Click on the 'Download' sign
- Click on the latest version for installation
- Allow to install unknown app
- Click on the 'install' sign
- Open application
- Start Ozeki Android SMS Gateway
- Make sure the application is running
- Check connection details
Installing Ozeki Android SMS Gateway (Video Tutorial)
In this short video, you are given an easy guide about how to install Ozeki Android SMS Gateway on your Android device. The whole process begins with browsing android-sms-gateway.com. You will also need to allow your phone to install unknown app. By watching the video you will see how simple it is to download Android SMS Gateway on your phone (Video 2).
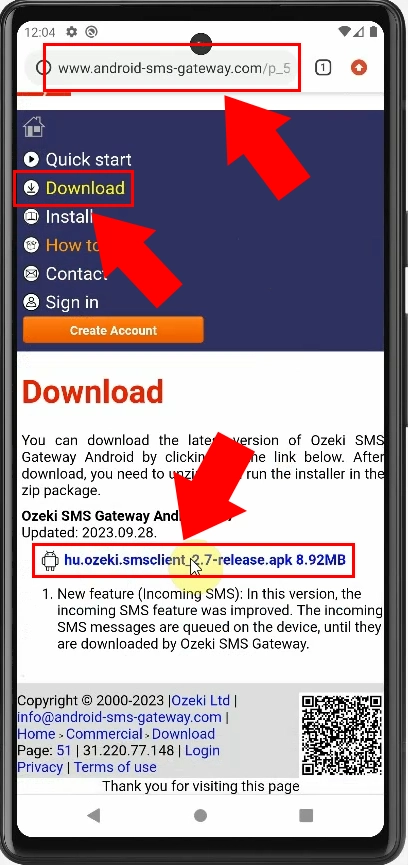
The first step you need to take is to browse android-sms-gateway.com. Once you are on the website, you need to click on the 'Download' button, shown in the picture (Figure 5). After doing so, you will see the latest available version of Ozeki SMS Gateway Android.
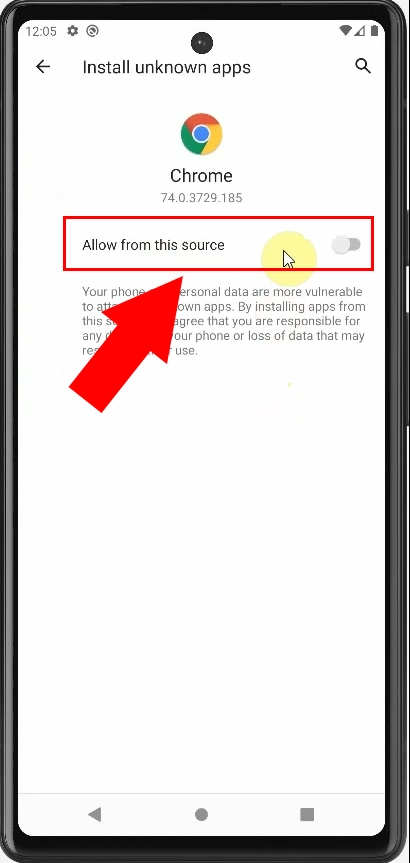
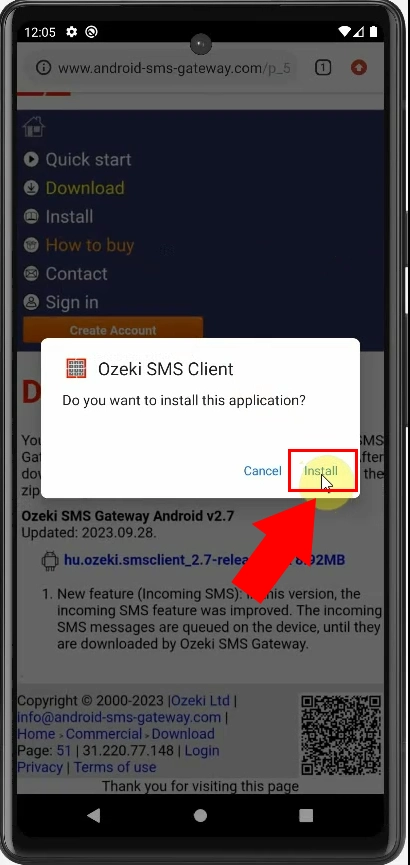
After allowing installation the system will ask you if you want to install the application. You have to click on the 'Install' button to continue the process (Figure 7).
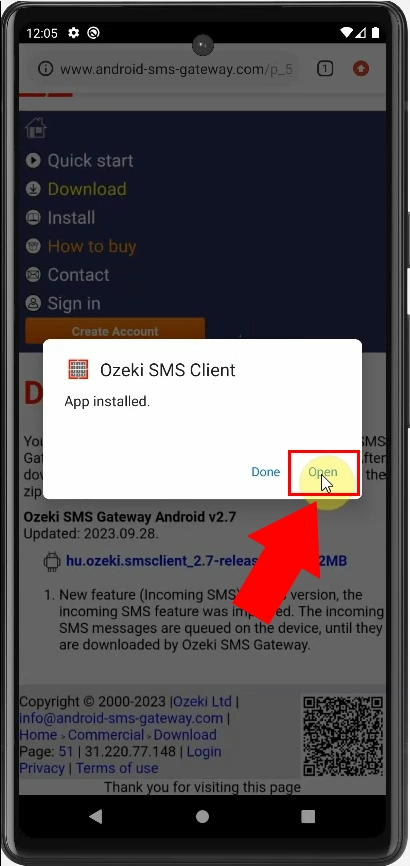
Once the application is installed, you will see it on your phone screen. Than, you can open Ozeki Android SMS Gateway by clicking on the 'Open' button, shown in the picture (Figure 8).
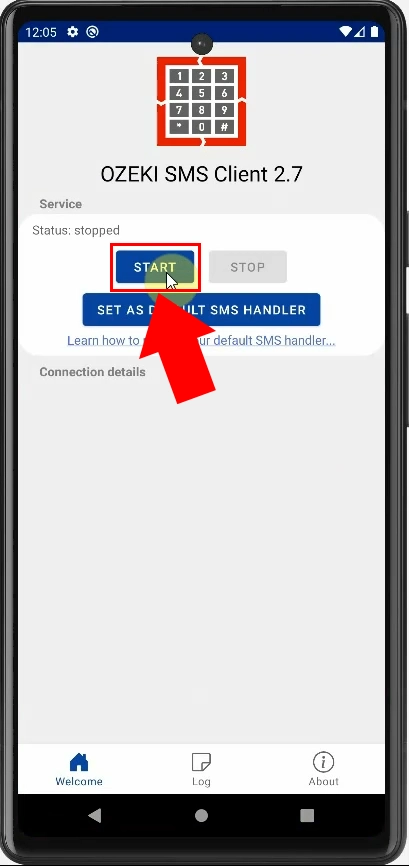
If you click on the 'Open' button, you are now inside the Ozeki Android SMS Gateway application. In order to start the app, you need the click on the 'Start' sign shown by the red arrow (Figure 9).
You can be sure that the application is running if you see the 'Status: running' sign in the upper left corner, under the 'Service' sign (Figure 10). In the middle of the screen, you can also view the connection details connected to the SIM cards.
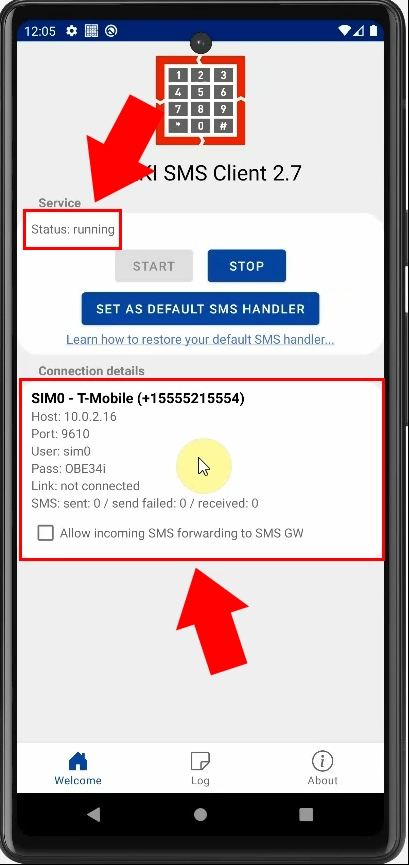
Check the connection details for the two SIM cards.
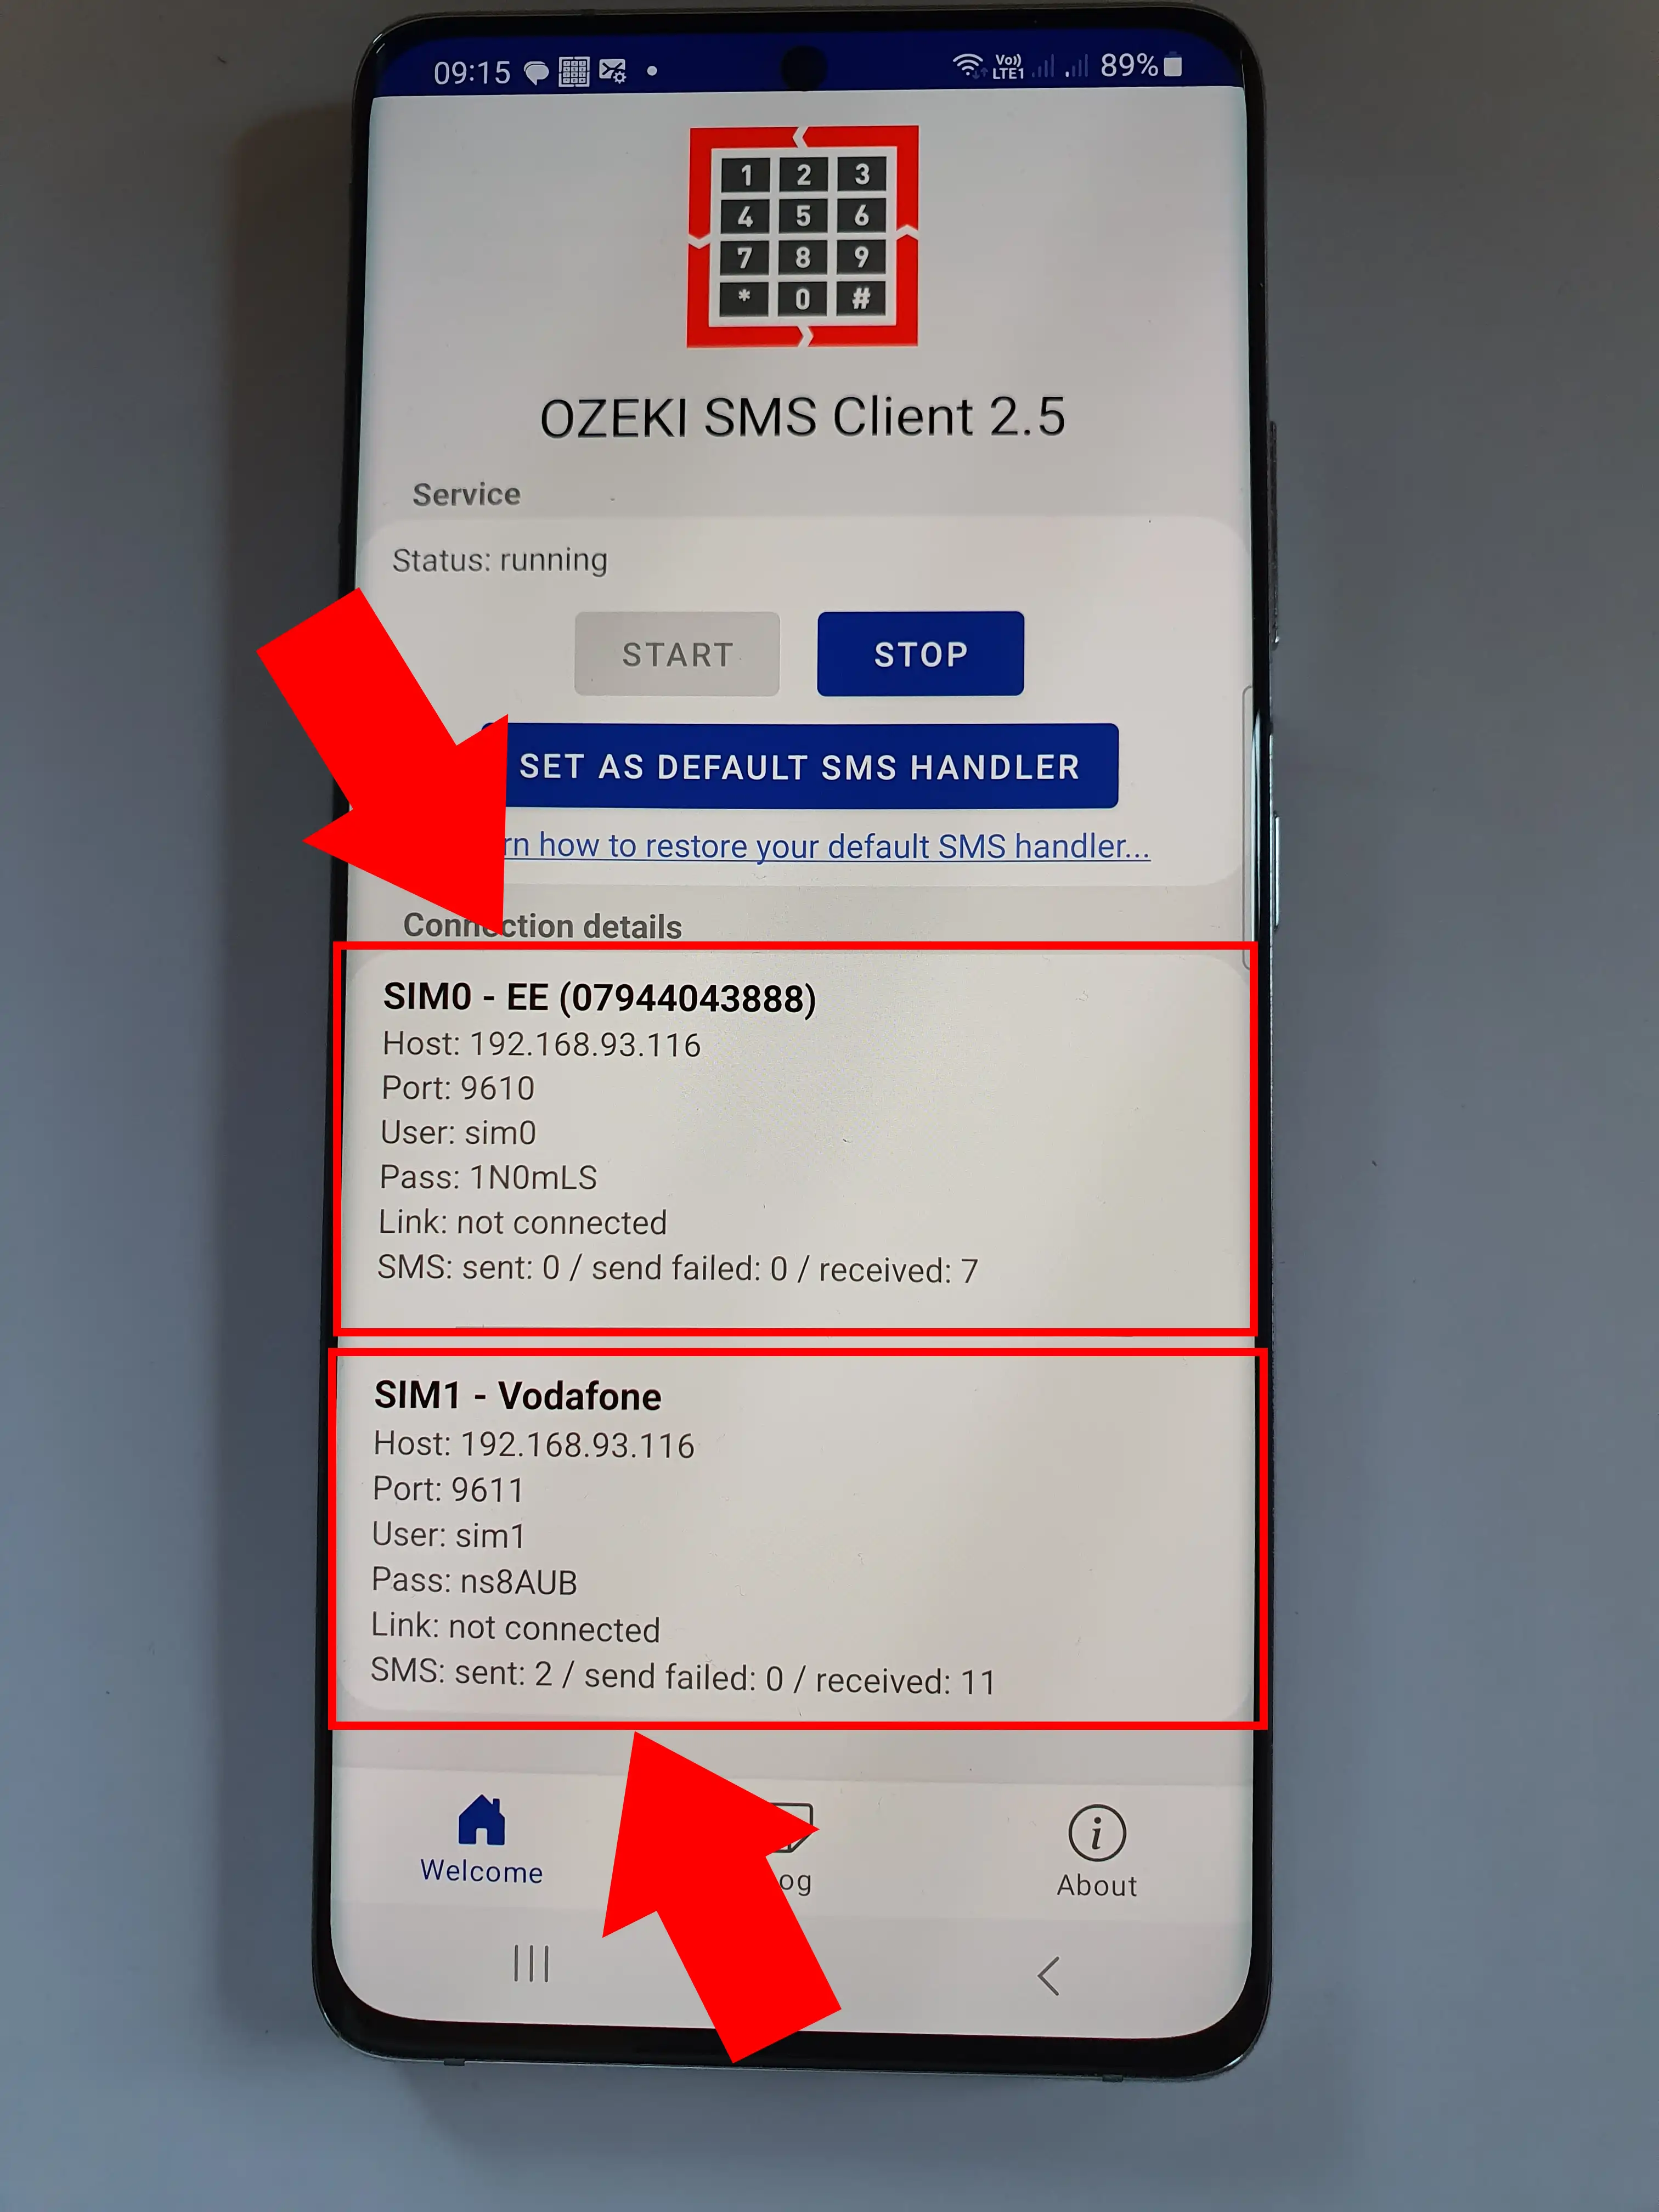
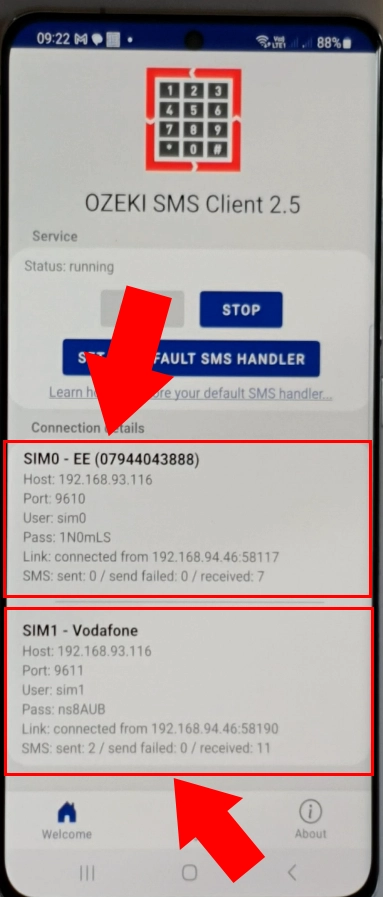
When the Ozeki SMS Client is running, it will show you the details of the connection to the SMS Gateway in two separate box, each box for one SIM card (Figure 11).You can look over the most important information, like SIM card number, HOST IP address, Port number, Username, Password, IP address of the linked devices which in our case are not connected. And also the number of SMS messages sent, failed and received.
Configure the two SIMs in Ozeki SMS Gateway on Windows
Configuring two SIM cards in Ozeki SMS Gateway on Windows (Quick Steps)
- Run Ozeki SMS Gateway on Windows
- Click on 'Add new connection..."
- Install Android SMS client connection
- Define SIM0 connection details
- Switch the 'Connection' button on
- Make sure the connection was successful
- Click on 'Add new connection...
- Define SIM1 connection details
- Switch the 'Connection' button on
- Make sure the connection was successful
- Make sure SMS Gateway connected to the two SIM cards
Configuring two SIM cards in Ozeki SMS Gateway on Windows (Video Tutorial)
In this video guide, you will be shown how to configure the two SIM cards in Ozeki SMS Gateway on Windows. You will see how simple it is once you know where to click, and what information you are asked to give out. This short video will be an assist for that (Video 3).
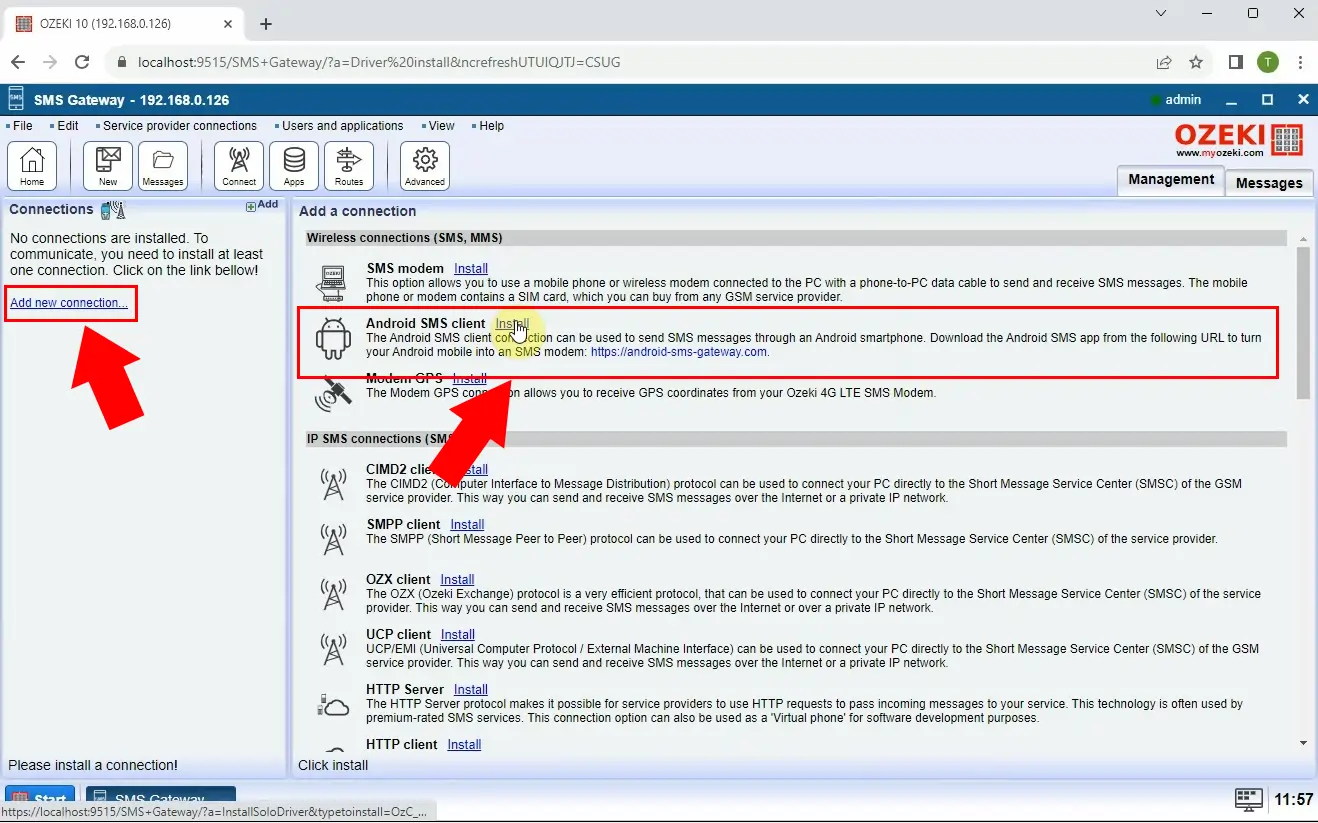
First of all, once you are in Ozeki SMS Gateway on Windows, you need to click on the 'Add new connection...' sign and install 'Android SMS client', shown by the red arrow (Figure 12).
After succeeding in the first step you will be asked connection-related information in order to connect the phone (Figure 13). You need to enter the hostname or IP address and the port of your phone. Furthermore, you need to enter your username and password as well. Click on the 'OK' button once you are done.
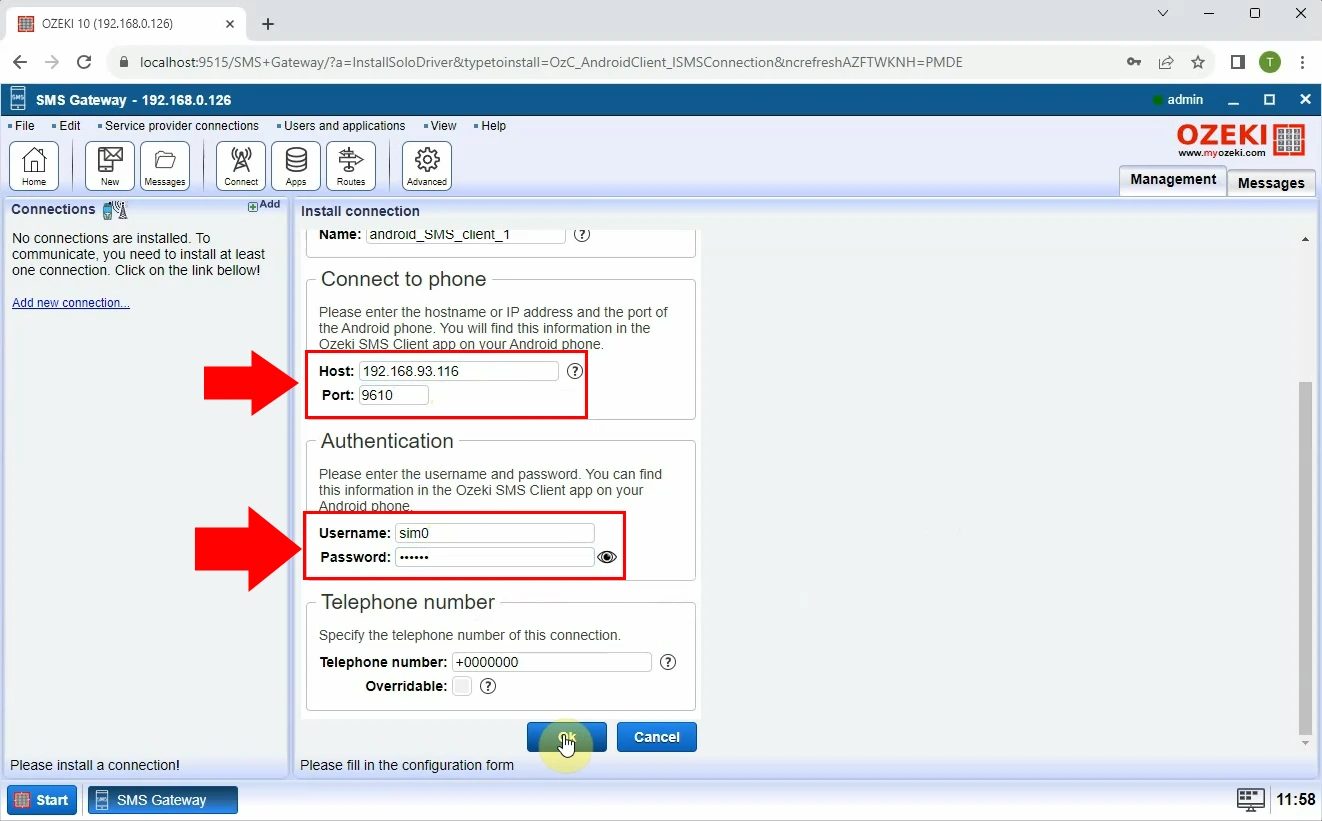
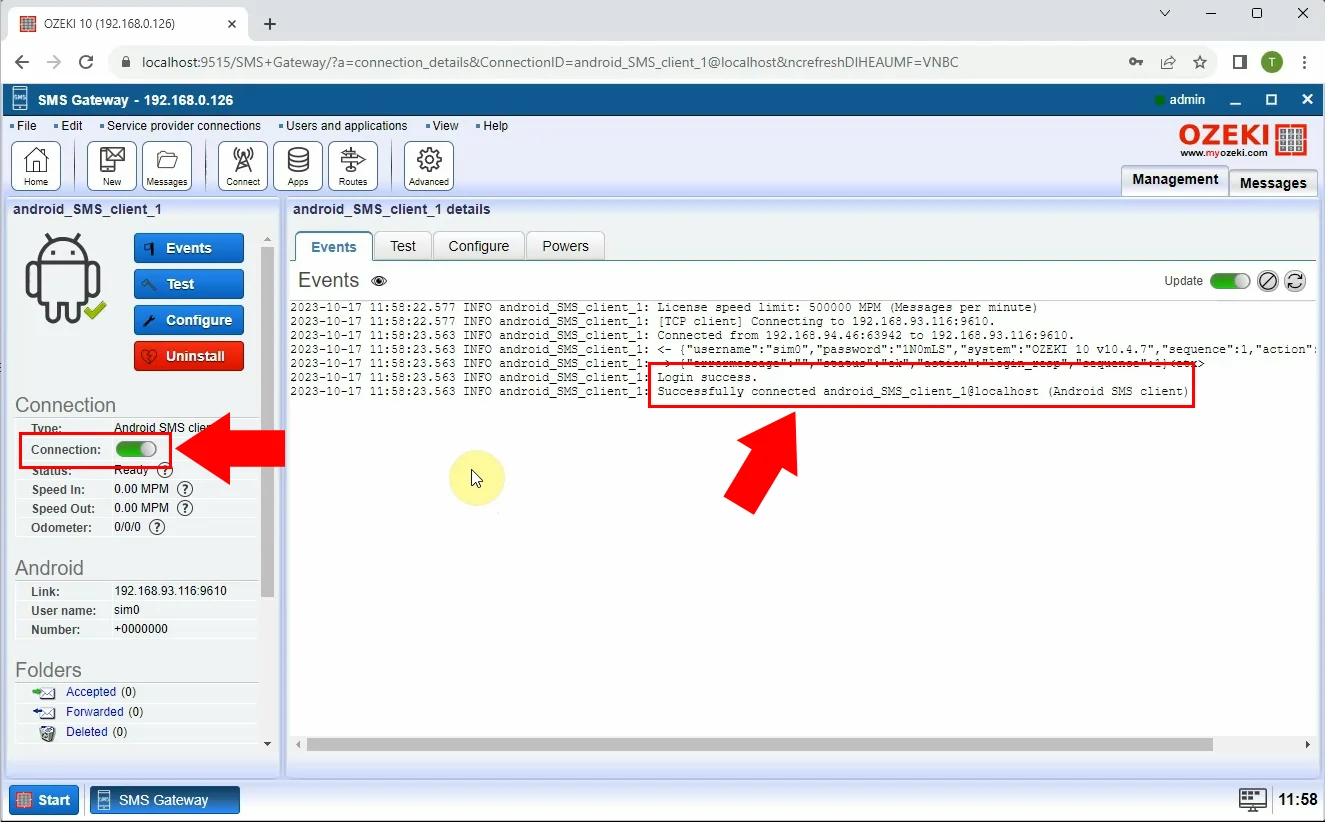
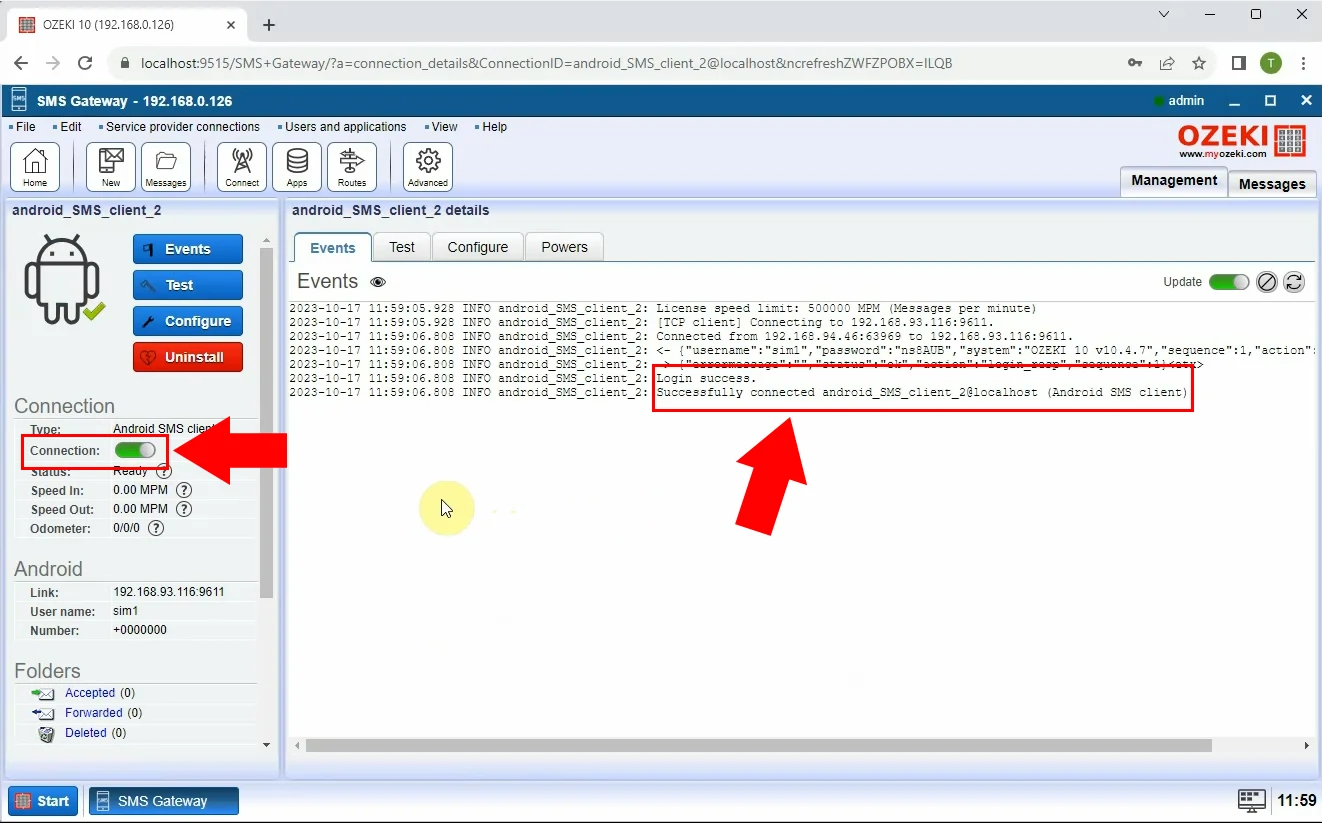
After clicking on the 'OK' button, you now have to connect to SIM0. To do that you need to switch the 'connection' sign on the left side of the page on (Figure 14). It will turn green if you did it correctly. As you can see in the picture if this step was successful you will see a 'Successfully connected...' sign.
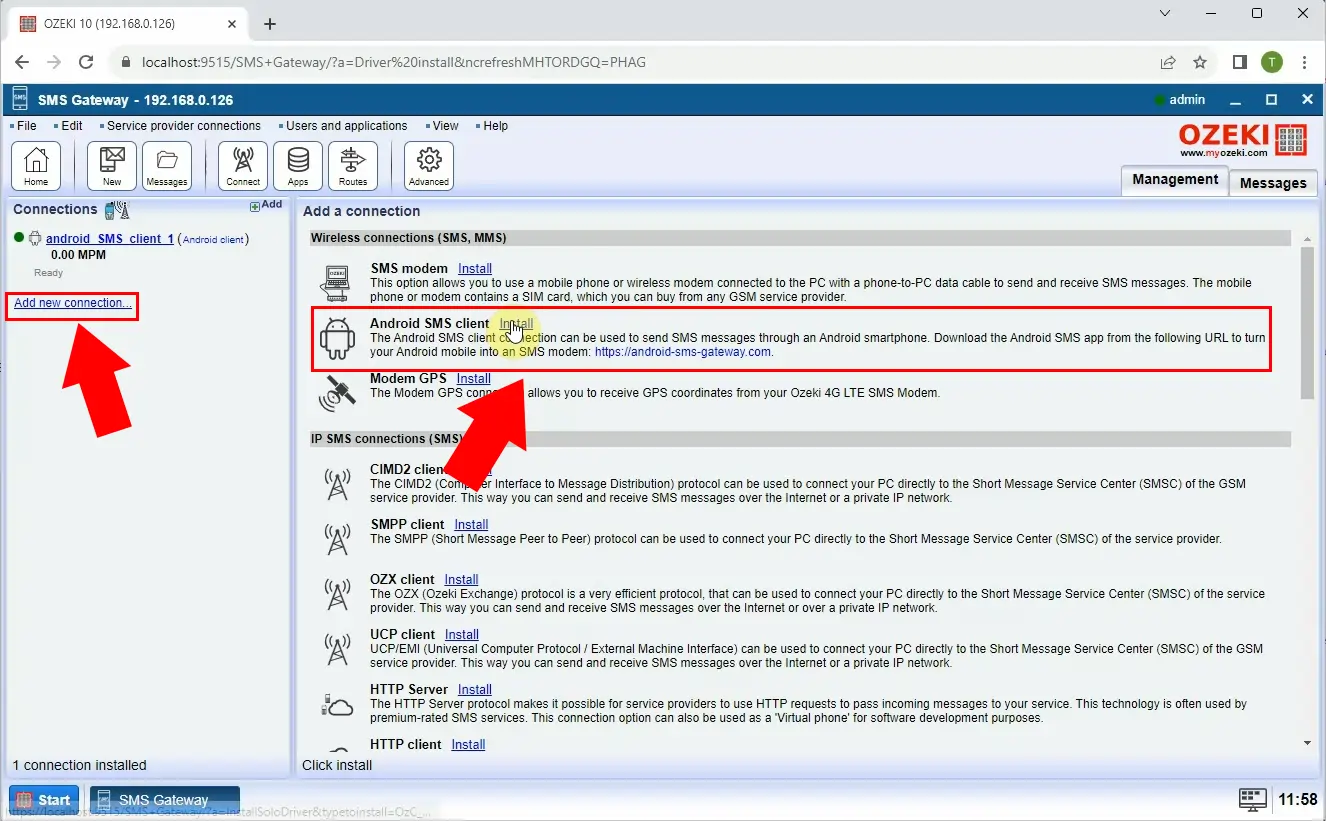
Now you have to do all these steps all over again, the only difference is that now with SIM1. Click on the 'Add new connection...' sign and install 'Android SMS client' (Figure 15).
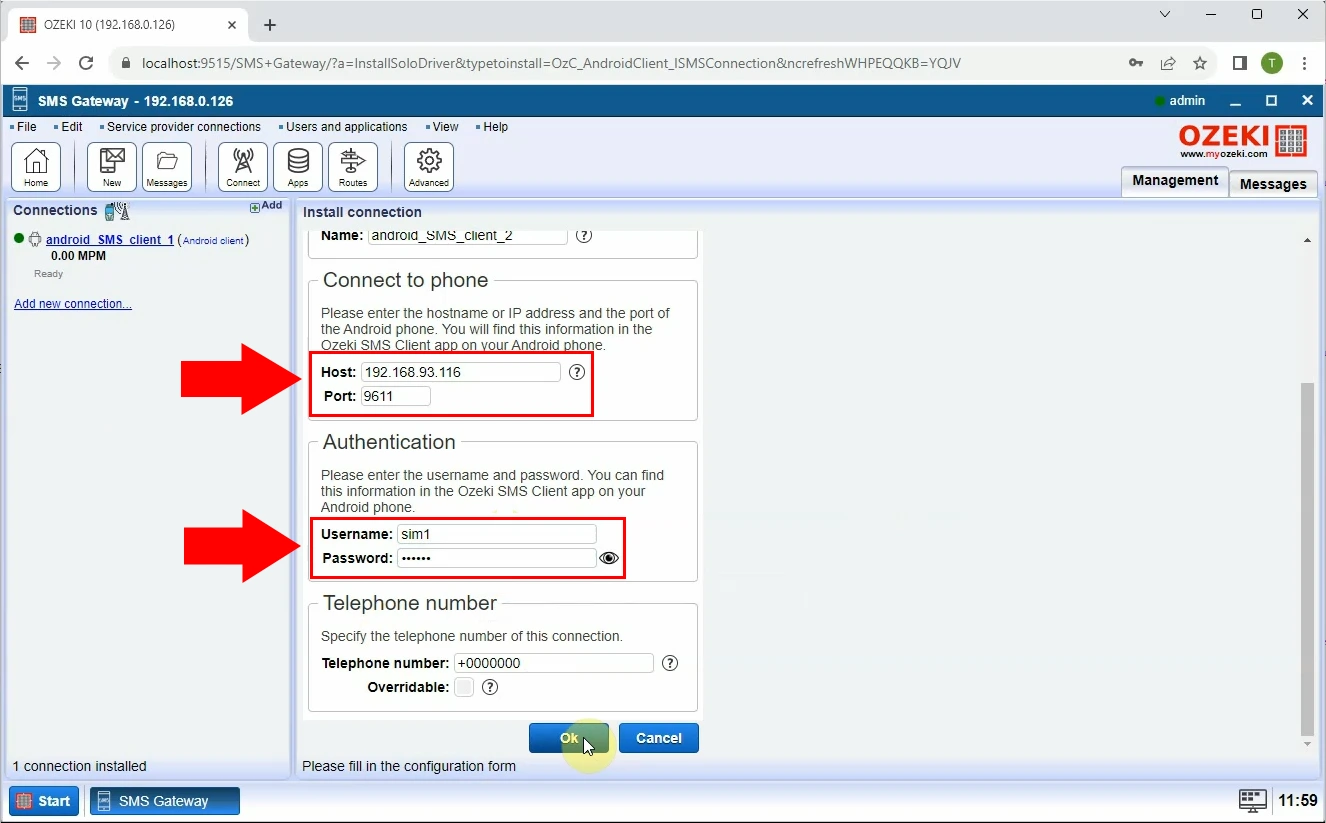
You need to give out information related to the SIM1 connection details (Figure 16). You need to enter the hostname or IP address and the port of your phone. You will also need to enter your username and password. Click on the 'OK' button once you are done.
In order to connect to SIM1, you need to switch the 'connection' sign on the left side of the page on (Figure 17). It will turn green if you did it correctly. If you did this step correctly you will see a 'Successfully connected...' sign.
You can open Ozeki Android SMS Gateway on your phone to make sure that both SIM cards are properly connected (Figure 18).
Send an SMS on SIM1
Sending an SMS on SIM1 (Quick Steps)
- Run Ozeki SMS Gateway on Windows
- Open Android SMS client 1
- Click on the 'Test' sign
- Enter telephone number
- Enter text message
- Click on the 'Send' sign
- Make sure your message was sent successfully
- Check the sent message log
Sending an SMS on SIM1 (Video Tutorial)
In this video, you can learn about how to send an SMS on SIM1. This guide shows how simple it is to send an SMS message. The video starts with giving the telephone number and ends with a successfully sent SMS (Video 4).
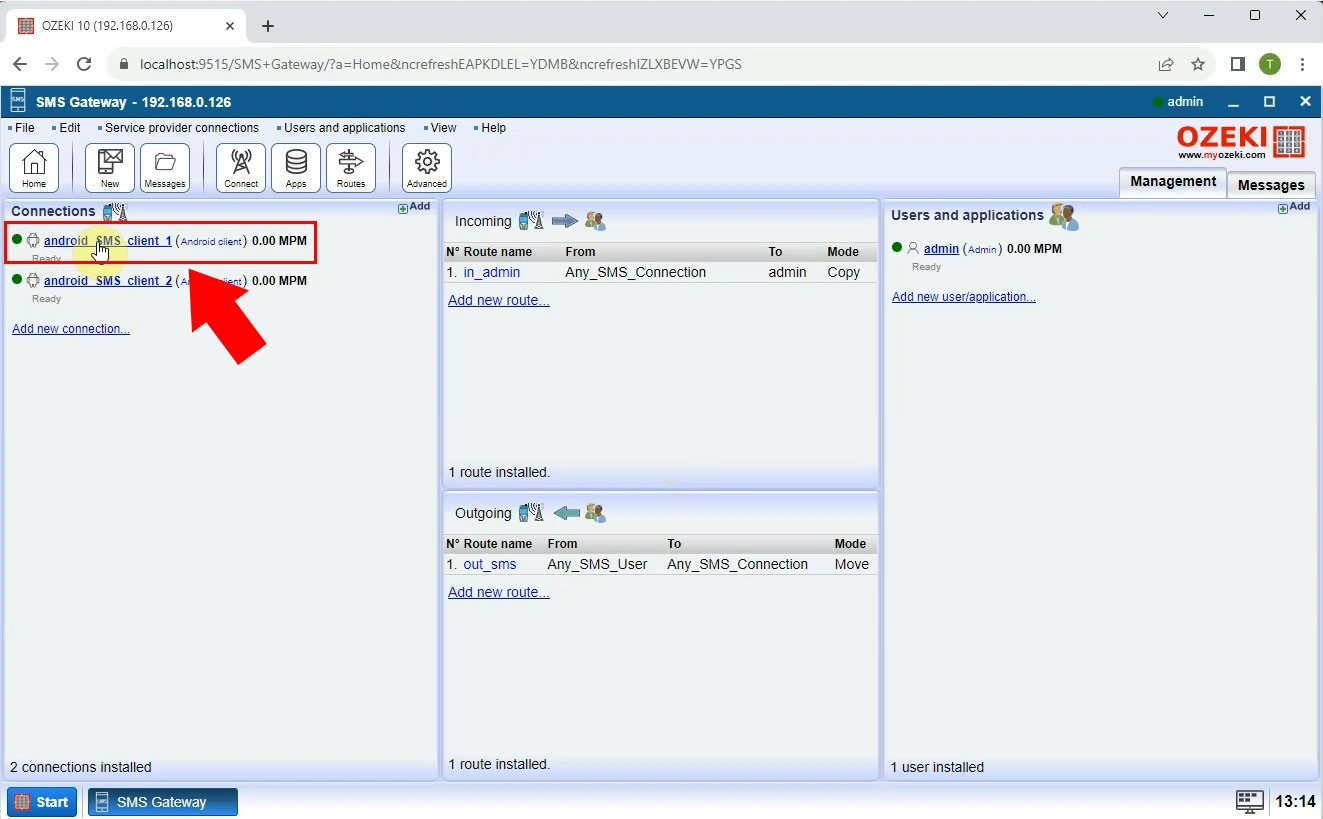
The first thing you need to do is open 'Android SMS client 1' on the left side of the page (Figure 19).
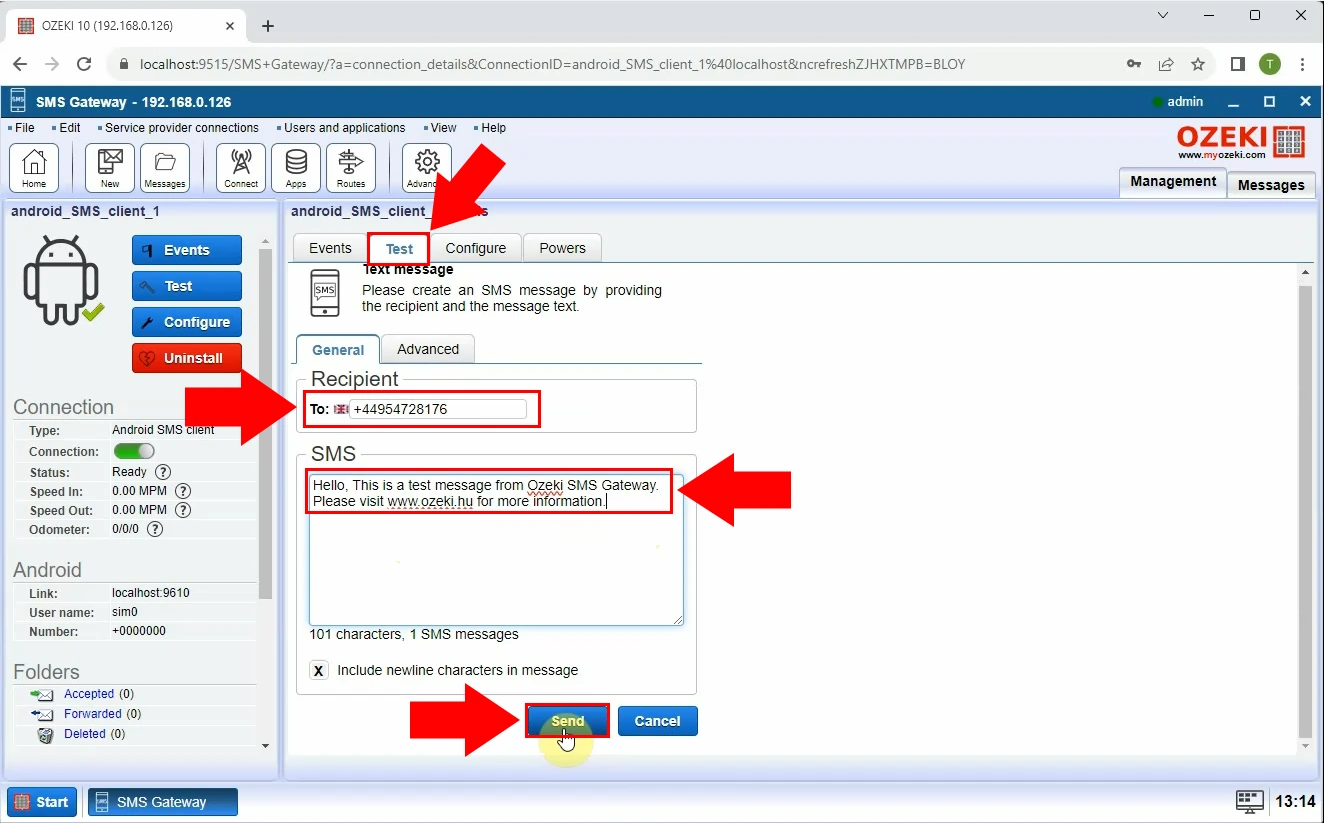
Now you have to click on the 'Test' sign to start the process. You have to enter your telephone number and the text you are about to send (Figure 20). Once you are done you need to click on the 'Send' button.
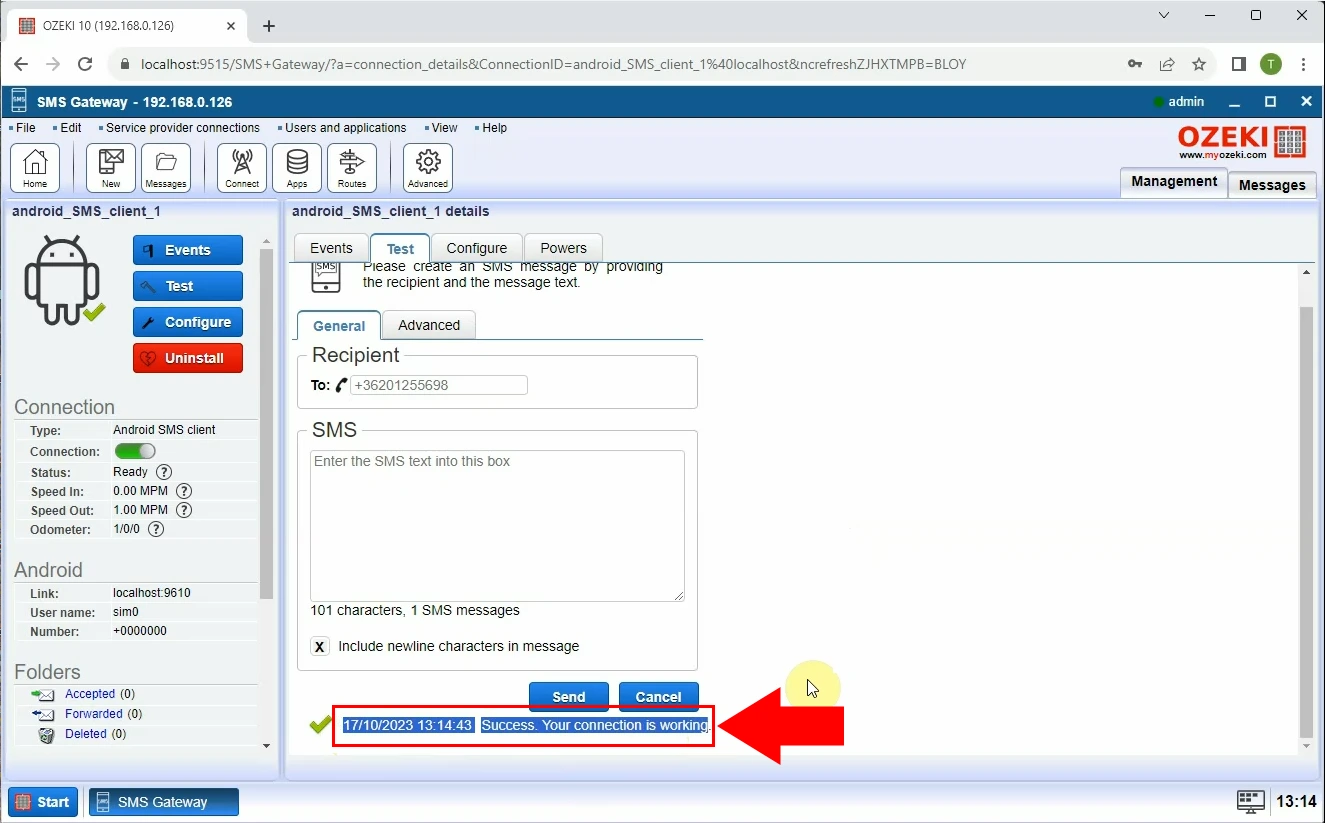
If your message was successfully sent, you will see a sign saying 'Success (Figure 21). Your connection is working.
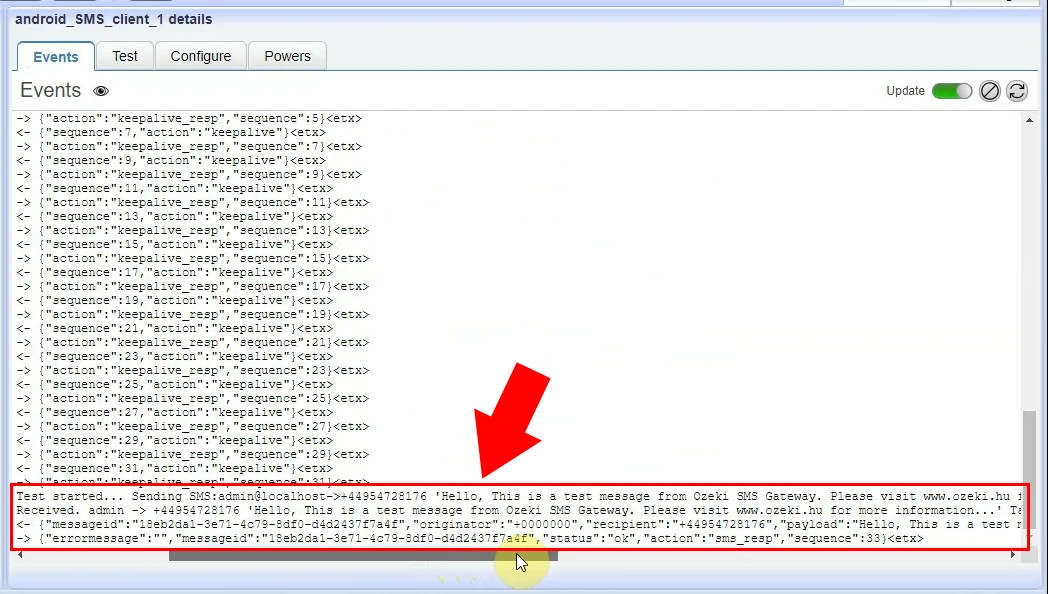
You can make sure that the test has started by clicking on the 'Events' sign. You will be sent a message log (Figure 22).
Send an SMS on SIM2
Sending an SMS on SIM2 (Quick Steps)
- Run Ozeki SMS Gateway on Windows
- Open Android SMS client 2
- Click on the 'Test' sign
- Enter telephone number
- Enter text message
- Click on the 'Send' sign
- Make sure your message was sent successfully
- Check the sent message log
Sending an SMS on SIM2 (Video Tutorial)
In this video, you can learn about how to send an SMS on SIM2. Basically, the only thing you need to do is repeat the very same steps you have just done. The video starts with entering the telephone number and ends with a successfully sent SMS on SIM2 (Video 5).
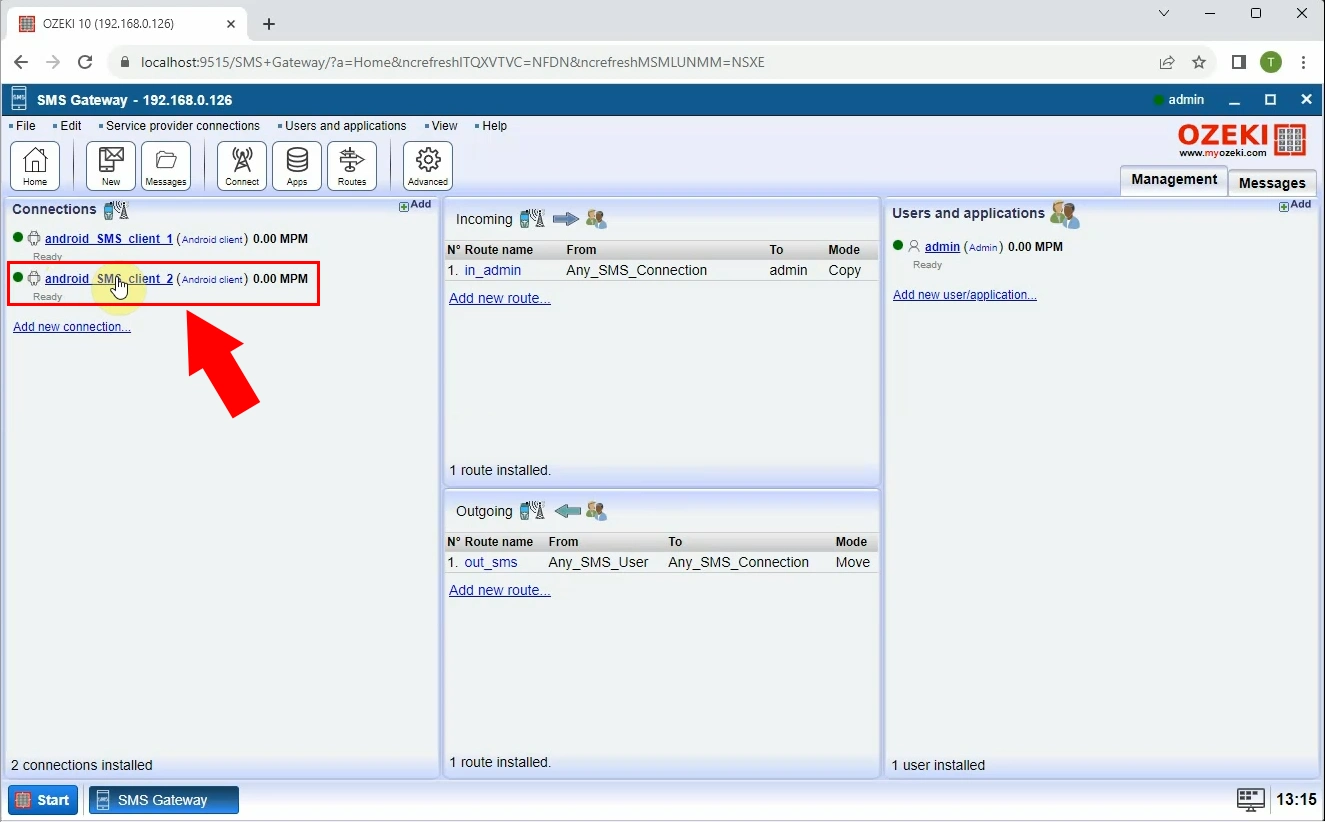
The first thing you need to do is open 'Android SMS client 2' on the left side of the page (Figure 23).
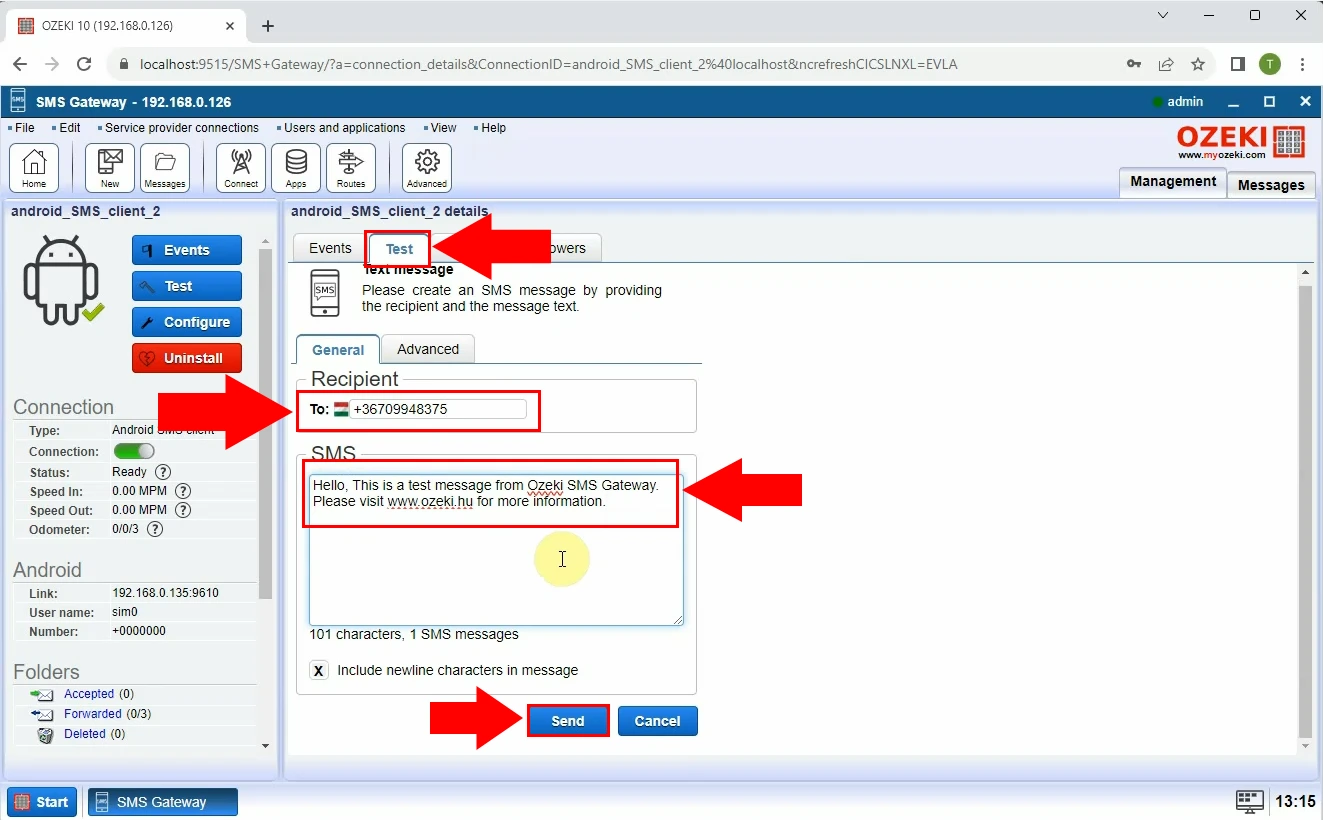
You have to click on the 'Test' sign to start the process (Figure 24).You have to enter your telephone number and the text you are about to send. Once you are done you need to click on the 'Send' button.
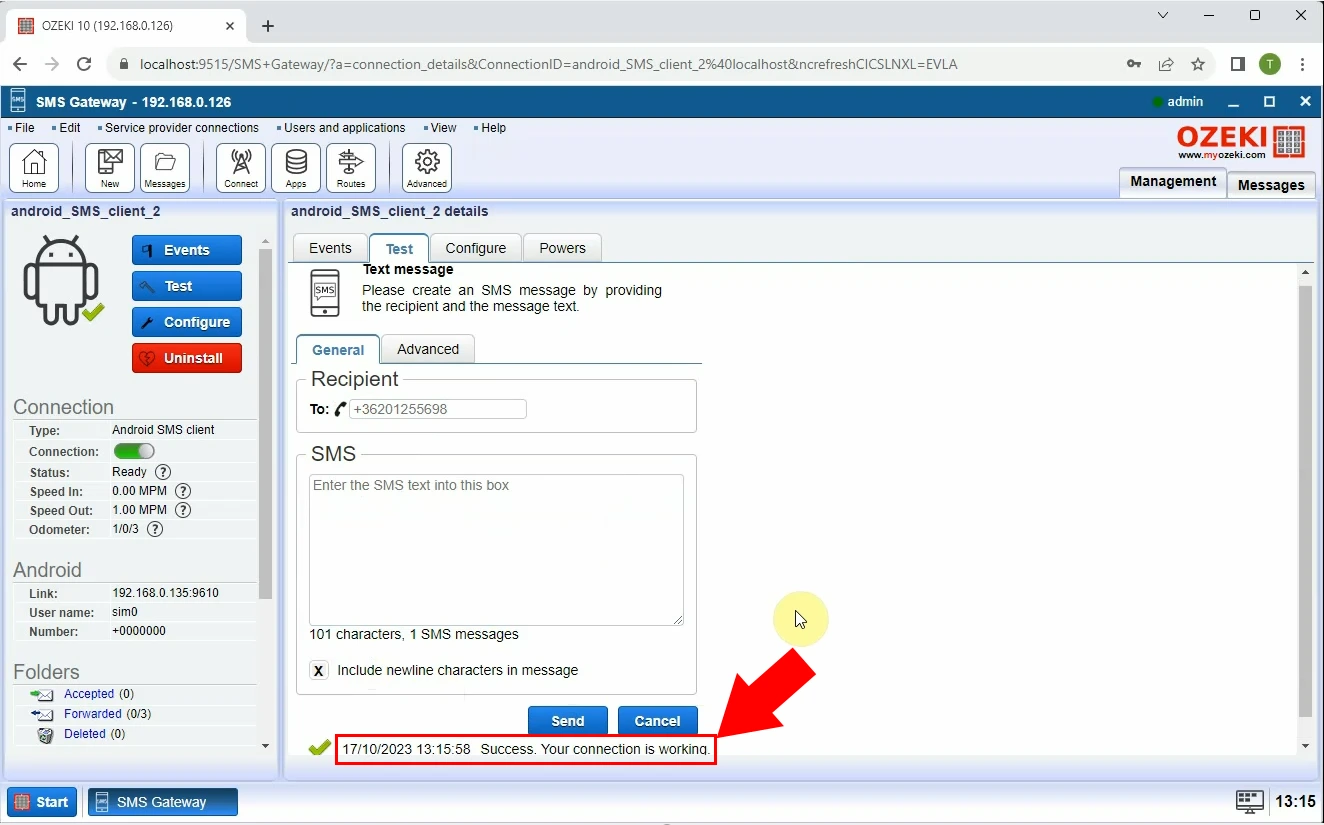
If you see a sign saying 'Success. Your connection is working', then your message was sent successfully (Figure 25).
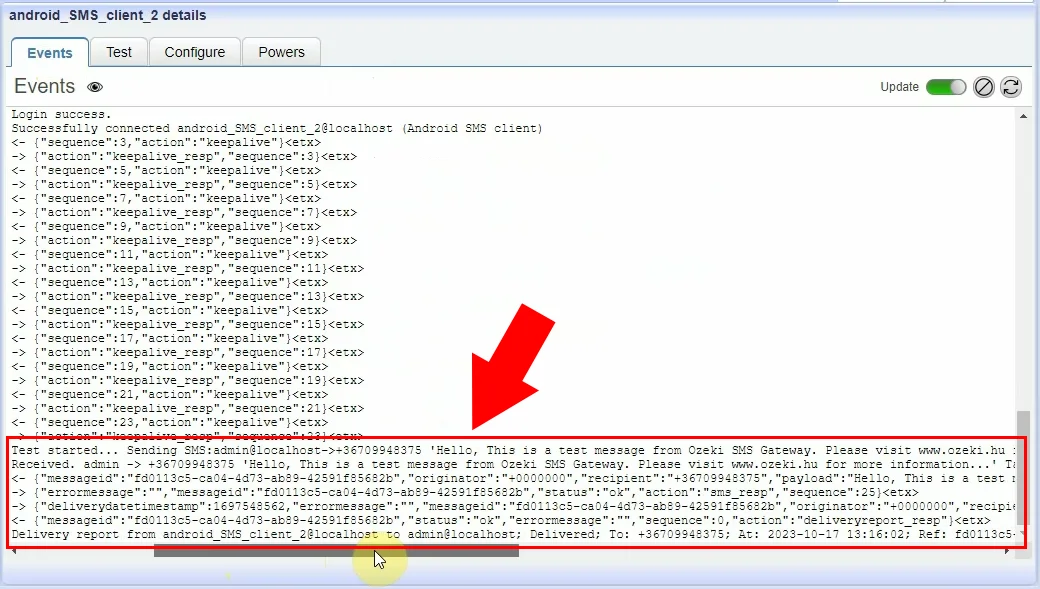
You can make sure that the test has started by clicking on the 'Events' sign. You will be sent a message log (Figure 26).
Conclusion
All in all having a DUAL SIM phone can change your life for the better. The possibility to use two SIM cards in a single device offers you a range of benefits, such as cost savings, work-life balance, increased privacy, and greater convenience in managing multiple phone numbers. Our guide helps you through the process of inserting two SIM cards into your Android device, configuring both SIMs in Ozeki SMS Gateway and seeing its advantages during the process.Is it better to have 2 phones or dual SIM?
Having a dual SIM phone is often the better option for many people due to its advantages, such as cost-efficiency, convenience, and simplicity in managing your communication needs. While having 2 mobile phones at once carries a lot of inconvenience. Maintaining two phones can be more expensive than having one, considering the costs of purchasing, activating, and maintaining them. Carrying can also be an issue as it is less likely to be comfortable. Having a backup phone can be helpful, but it is not necessary in today's technology as dual SIM phones provide a practical and more economical alternative for managing multiple numbers and communication needs in a single device.
Do you need 2 SIM cards for a dual SIM phone?
You do not need two SIM cards for a dual SIM phone. You can use a dual SIM phone with just one SIM card if that is all you have or need. Dual SIM phones are designed to support two SIM cards, but the choice whether you want to use one or both trays is entirely up to your preferences.
How does WhatsApp work on dual SIM?
WhatsApp can work on a dual SIM phone but your device and configuration is a main factor of how it works. Some dual SIM phones and specific WhatsApp versions offer the ability to use two separate WhatsApp accounts, each associated with a different SIM card. This allows you to keep personal and business contacts separate on the same device. You need to set up and verify each WhatsApp account with the right phone number. If your dual SIM phone does not support running two separate WhatsApp accounts, you can manually switch between SIM cards within the device's settings to use WhatsApp with different phone numbers.
