Android SMS Gateway Single SIM Setup
This article is about the setup of the Ozeki Android SMS Gateway. It offers reliable and easy SMS management in a secure, controlled environment. In this tutorial, you can see how easy it is to set up this solution, and it will take only about 5 minutes. You only need an Android phone and a Windows device. With Ozeki, you can route SMS messages and see delivery reports, all while maintaining data protection. Best of all, you can try it for free and achieve service provider independence, making it the ultimate SMS solution. Ozeki Android SMS Gateway is versatile and can be utilized by offices, average users, and small SMS campaigns. Ready to elevate your SMS management? Dive into our tutorial and experience the convenience and power of Ozeki SMS Gateway for yourself. Don't miss out—take the first step toward enhanced communication today!
What is Android SMS Gateway?
The Android SMS Gateway is an SMS app that turns your Android mobile phone into an SMS modem.
How to set Android SMS Gateway Single SIM (Quick steps)
Android SMS Gateway Single SIM Setup:
- Insert the SIM card into the phone
-
Install Ozeki SMS Gateway
- Check SIM connection details
- Configure SIM in Ozeki Gateway
- Launch Ozeki SMS Android Gateway
- Open SMS client connection
- Compose and send SMS message
- Congratulations! Your SMS Gateway is set up
Put a SIM card into the Android Phone (Video tutorial)
In this brief, under 3-minute video, we present how to insert the SIM card into the phone. The steps can be followed from unpacking the SIM card until the Android operating system recognizes the SIM cards and they appear in the Ozeki Android SMS gateway as active SIM cards. At first, we eject the SIM tray from the phone using the SIM pin. Following that, we unbox the SIM card and carefully break out the right-sized SIM card from the cardholder. After that, we put the SIM card into the SIM tray, then reinsert the SIM tray into the phone, ensuring it is oriented correctly. Join us for this straightforward and informative tutorial on Android SMS gateway setup with a single SIM.
Step 1 - Remove the SIM tray from the phone
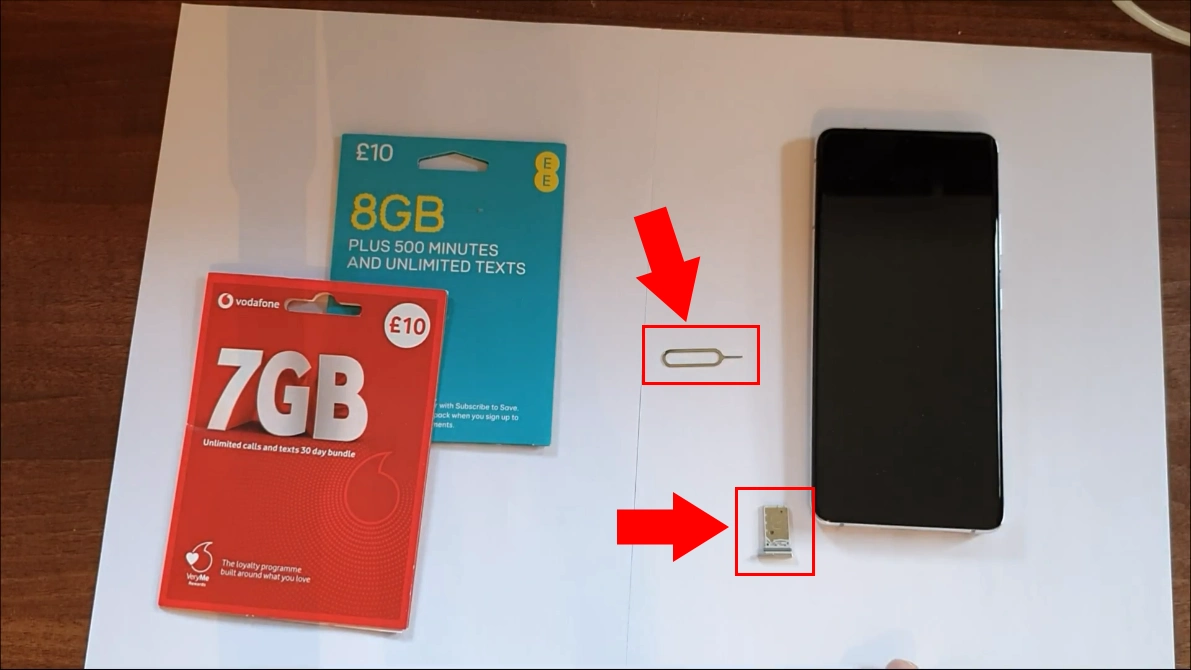
To use the Ozeki Android SMS gateway, first you have to insert a sim card into your phone. In the picture, at the left bottom corner of the phone, you can see a small rectangular thing, that's the SIM-tray, and between the boxes and the phone, there is an oval-shaped metal thing, that's the sim card pin. You have to locate the SIM tray on your phone. It is usually a small hole on the side or top of the phone, insert the SIM pin into the hole and press firmly. The SIM tray should pop out slightly (see Figure 1).
Step 2 - Place the SIM card into the SIM tray
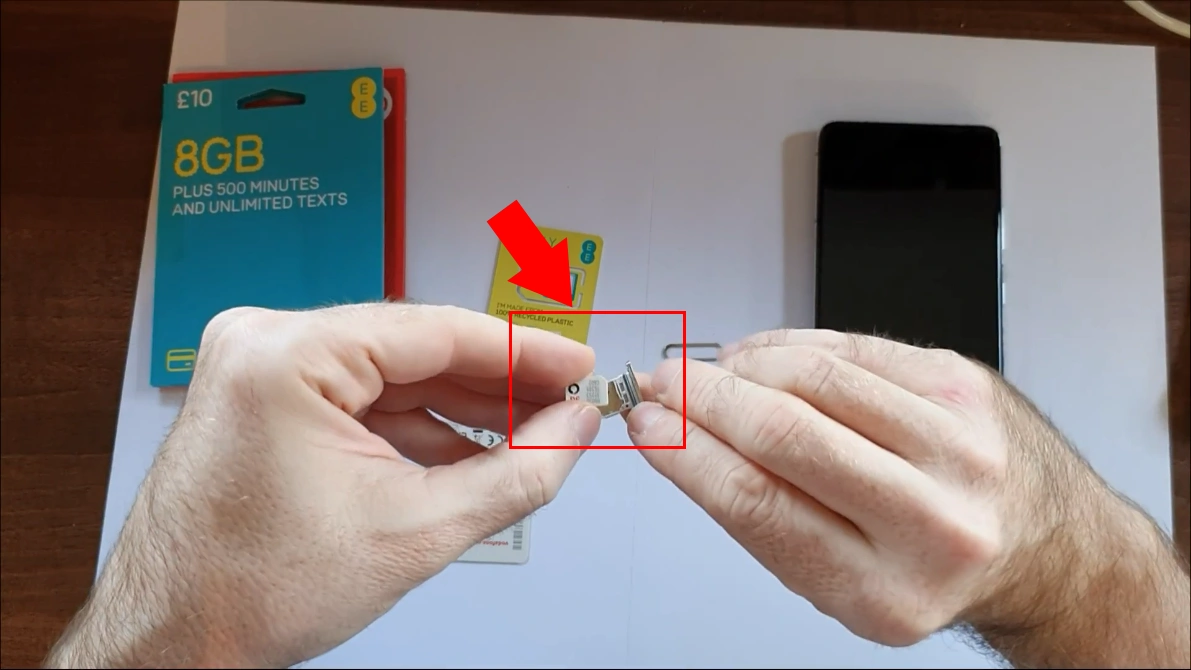
In the shop, you can purchase the SIM card with the activation paper. Open the package and take out the SIM card holder frame. Inside the frame, you can extract the SIM card in two different sizes. Take the SIM tray and check if you can insert the smaller or the larger size into it. In the video, we can see the smaller card. Carefully pop the SIM card out of the frame. Be cautious not to damage the card, as we won't be able to make calls or send SMS messages afterward. now locate the notched corner of the SIM card, and insert the SIM card into the SIM tray with the notched corner facing down. Then push the SIM card into the tray until it clicks into place (see Figure 2).
Step 3 - Reinsert the SIM tray into the phone
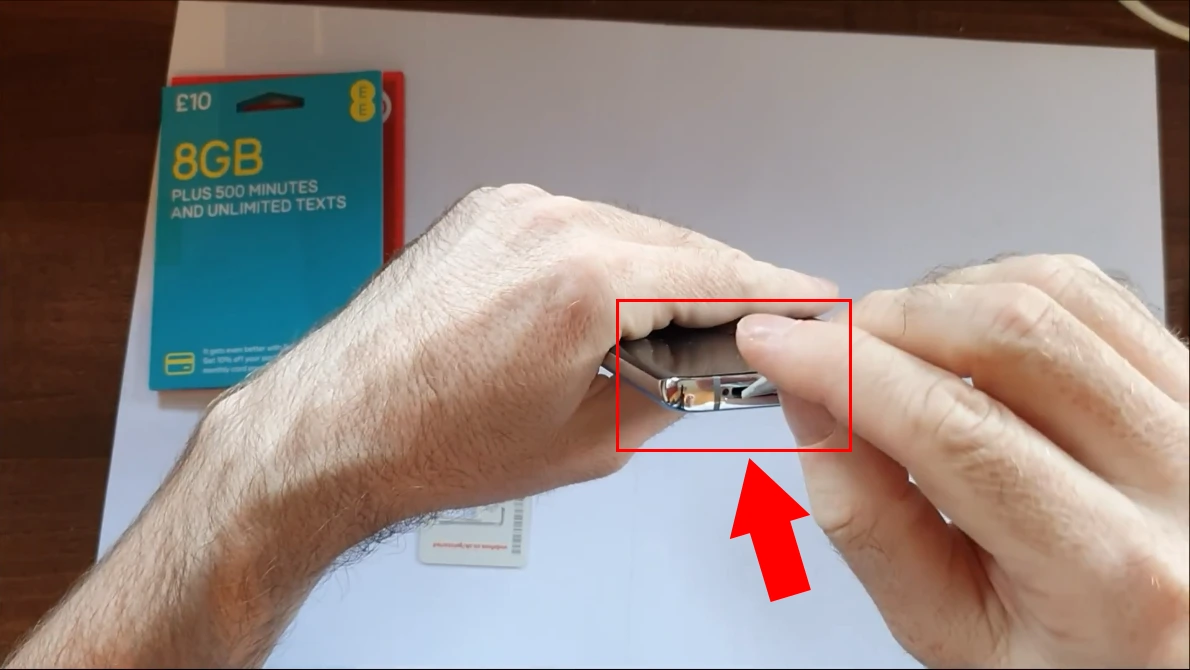
First, you need to determine the correct orientation for inserting the SIM card into your phone (see Figure 3). Be sure not to force it the wrong way, as it could damage the SIM card. After successfully inserting your SIM card, turn on your phone and you'll come to the "Setup your SIMs" screen. Press "Next" to proceed. If you have multiple SIM cards in your phone, select "SIM1" and press "Next" on the Messages screen. Repeat this process on the Data screen. Finally, you'll see your active SIM cards, and you can confirm the setup by pressing "Done." The SIM card insertion is complete. If you had the Ozeki Android SMS Gateway installed on your phone previously, in the next section, you'll see how the data shown in the app when two SIM cards are inserted. If you haven't installed the Ozeki Android SMS Gateway on your mobile phone before, continue by watching the "Install Ozeki Android SMS Gateway on the Phone" video and follow the detailed steps explaining the entire process. Your SIM card setup is finished.
Two SIM cards in the Ozeki Android SMS Gateway
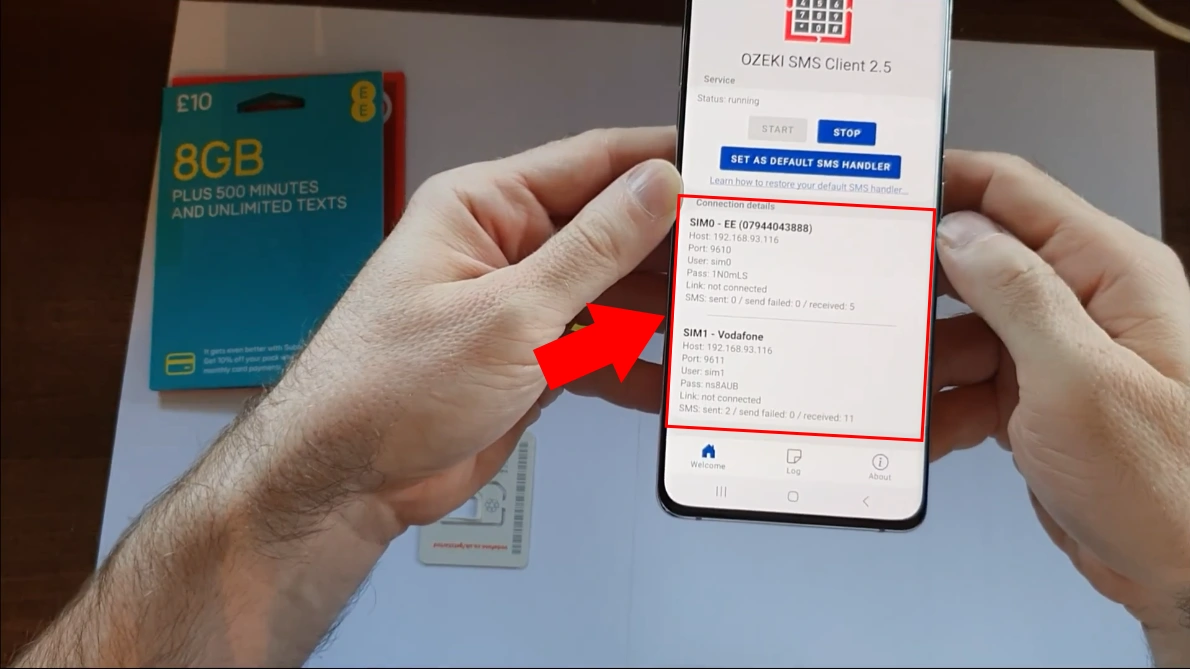
This screenshot shows the Ozeki SMS Gateway App on a phone. The app shows two SIM cards,
SIM0 and SIM1. SIM0 is labeled "EE (07944043888)" and SIM1 is labeled "Vodafone."
How to tell if you have multiple SIM cards using the Ozeki SMS Gateway App:
If you have multiple SIM cards, you will see them listed in the Ozeki SMS Gateway App. To open the Ozeki SMS Gateway App,
go to your phone's app drawer and tap on the Ozeki SMS Gateway icon.
How to switch between SIM cards using the Ozeki SMS Gateway App:
To switch between SIM cards, tap on the SIM card that you want to use in the Ozeki SMS Gateway App (see Figure 4).
Install Ozeki Android SMS Gateway on the Phone (Video tutorial)
In this concise 80-second video, we'll walk you through the hassle-free process of downloading and installing the Ozeki Android SMS Gateway application.
We'll start with opening your phone's browser, guiding you through downloading, handling warnings, and giving required permissions for a seamless app setup.
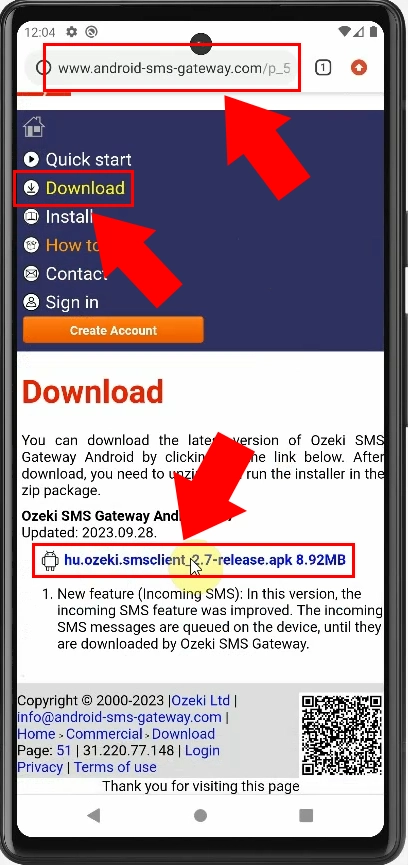
We open a web browser and visit the website www.android-sms-gateway.com.
On that website, we go to the download page and get the app file.
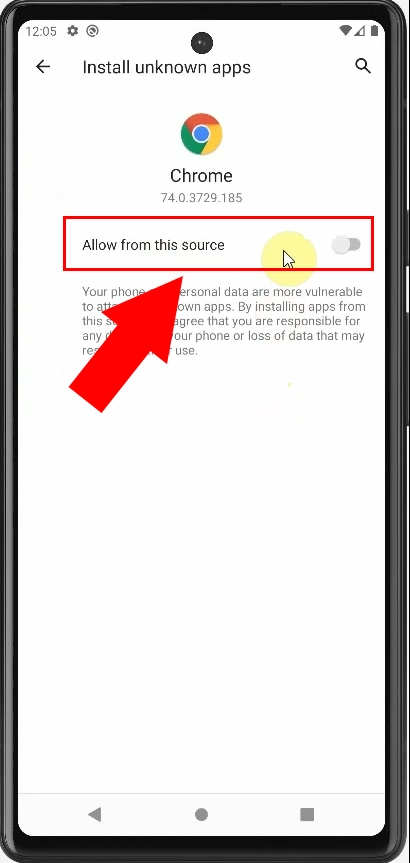
Then, we let the browser download the file from an unknown source.
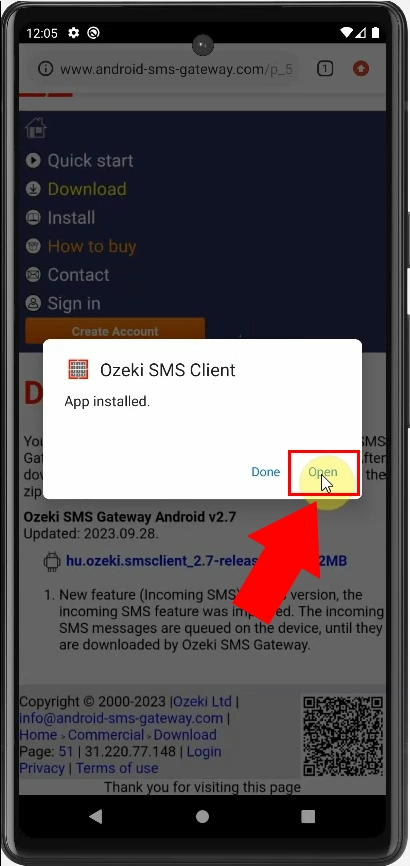
After that, we open the Ozeki Android SMS gateway app and permit it.
Once we've completed these steps, the app is all set to use
Step 1 - Visit the Ozeki website and download the .apk file
On the website www.android-sms-gateway.com, tap the Download button on the top menu, to download the Ozeki SMS Gateway APK file (see Figure 5). This will download the Ozeki SMS Gateway app to your Android device. This is the first step in installing the Ozeki SMS Gateway app, which allows you to turn your phone into an SMS modem. If you install this app to your Android phone, your Windows PC will be able to connect to your Android phone over Wifi and will be able to send SMS messages to the mobile network.
Step 2 - Allow file download for the browser
To install the Ozeki Android SMS Gateway, tap the Allow from this source button on your Android phone (see Figure 6). After downloading a popup will ask for it, you have to tap on 'Settings', you can see it in the video. This will allow you to install apps from unknown sources, which is necessary to install the Ozeki app.
Step 3 - Tap Install
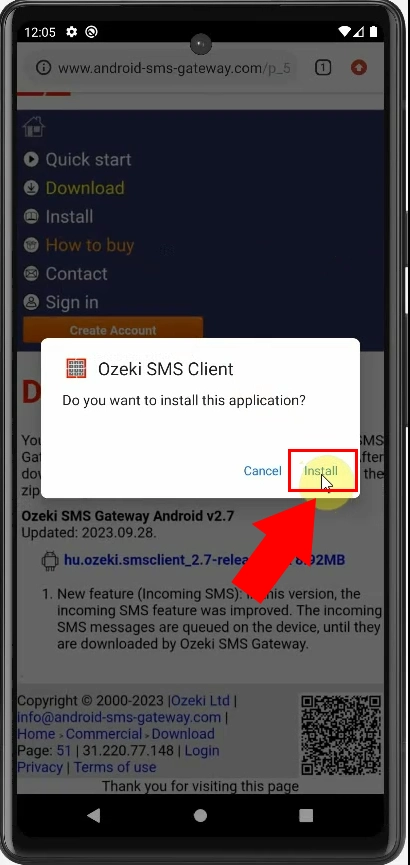
On the Android installation prompt, tap the Install button on the popup to install the Ozeki SMS Gateway app (see Figure 7). This popup will shown right after you allow 'Install unknown apps' like shown in the previous step. This will install the Ozeki SMS Gateway app on your Android device. This is the final step in installing the app.
Step 4 - Tap Open
To open the Ozeki SMS Gateway app, tap the Open button (see Figure 8). This popup will shown after the installing procedure is finished. This will launch the application on your Android device.
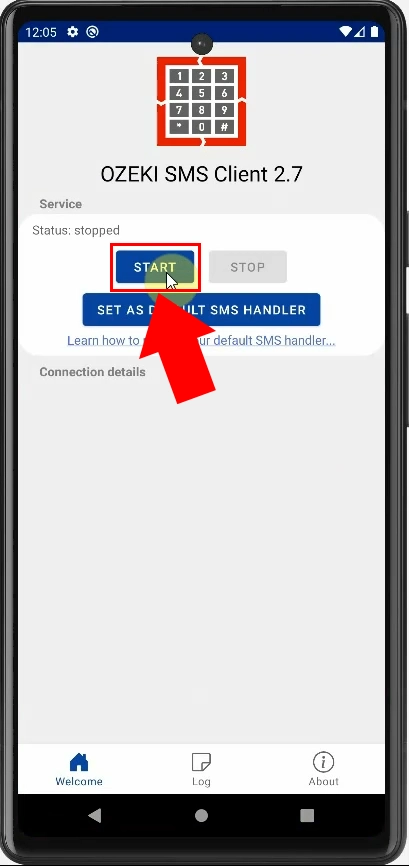
Step 5 - Tap the Start button in the Ozeki SMS Client app
On the Ozeki SMS Gateway app, tap the Start button (see Figure 9). This will start the Ozeki SMS Gateway Client, meaning your Windows PC will be able to connect to your phone, over wifi to enjoy the benefits of the Ozeki Android SMS Gateway.
Details about the gateway
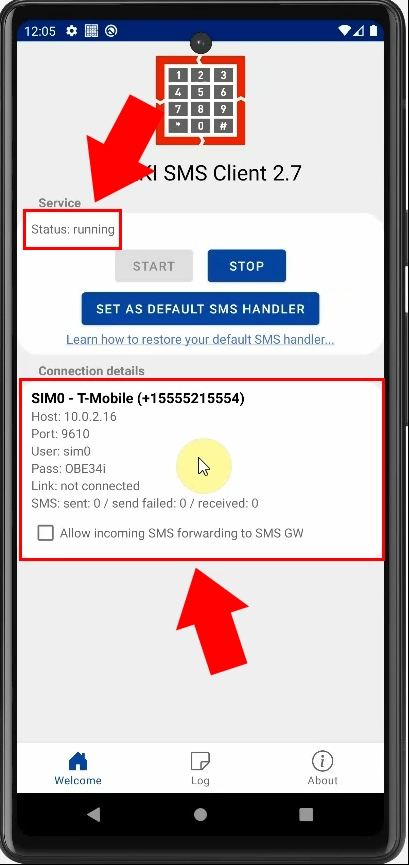
After tapping the start button you will see that the 'Status' will change to 'running',
and details will appear about the SIM card.
Details:
Status will show if it is running or not, and there will be the connection details (see Figure 10).
In our case you can see that the Status is running, SIM 0 is T-mobile(+15555215554), the host IP is 10.0.2.16, port is 9610
username is sim0, password is OBE34i, Link: not connected, SMS sent: 0 Failed: 0 received: 0
Check the connection details for the SIM
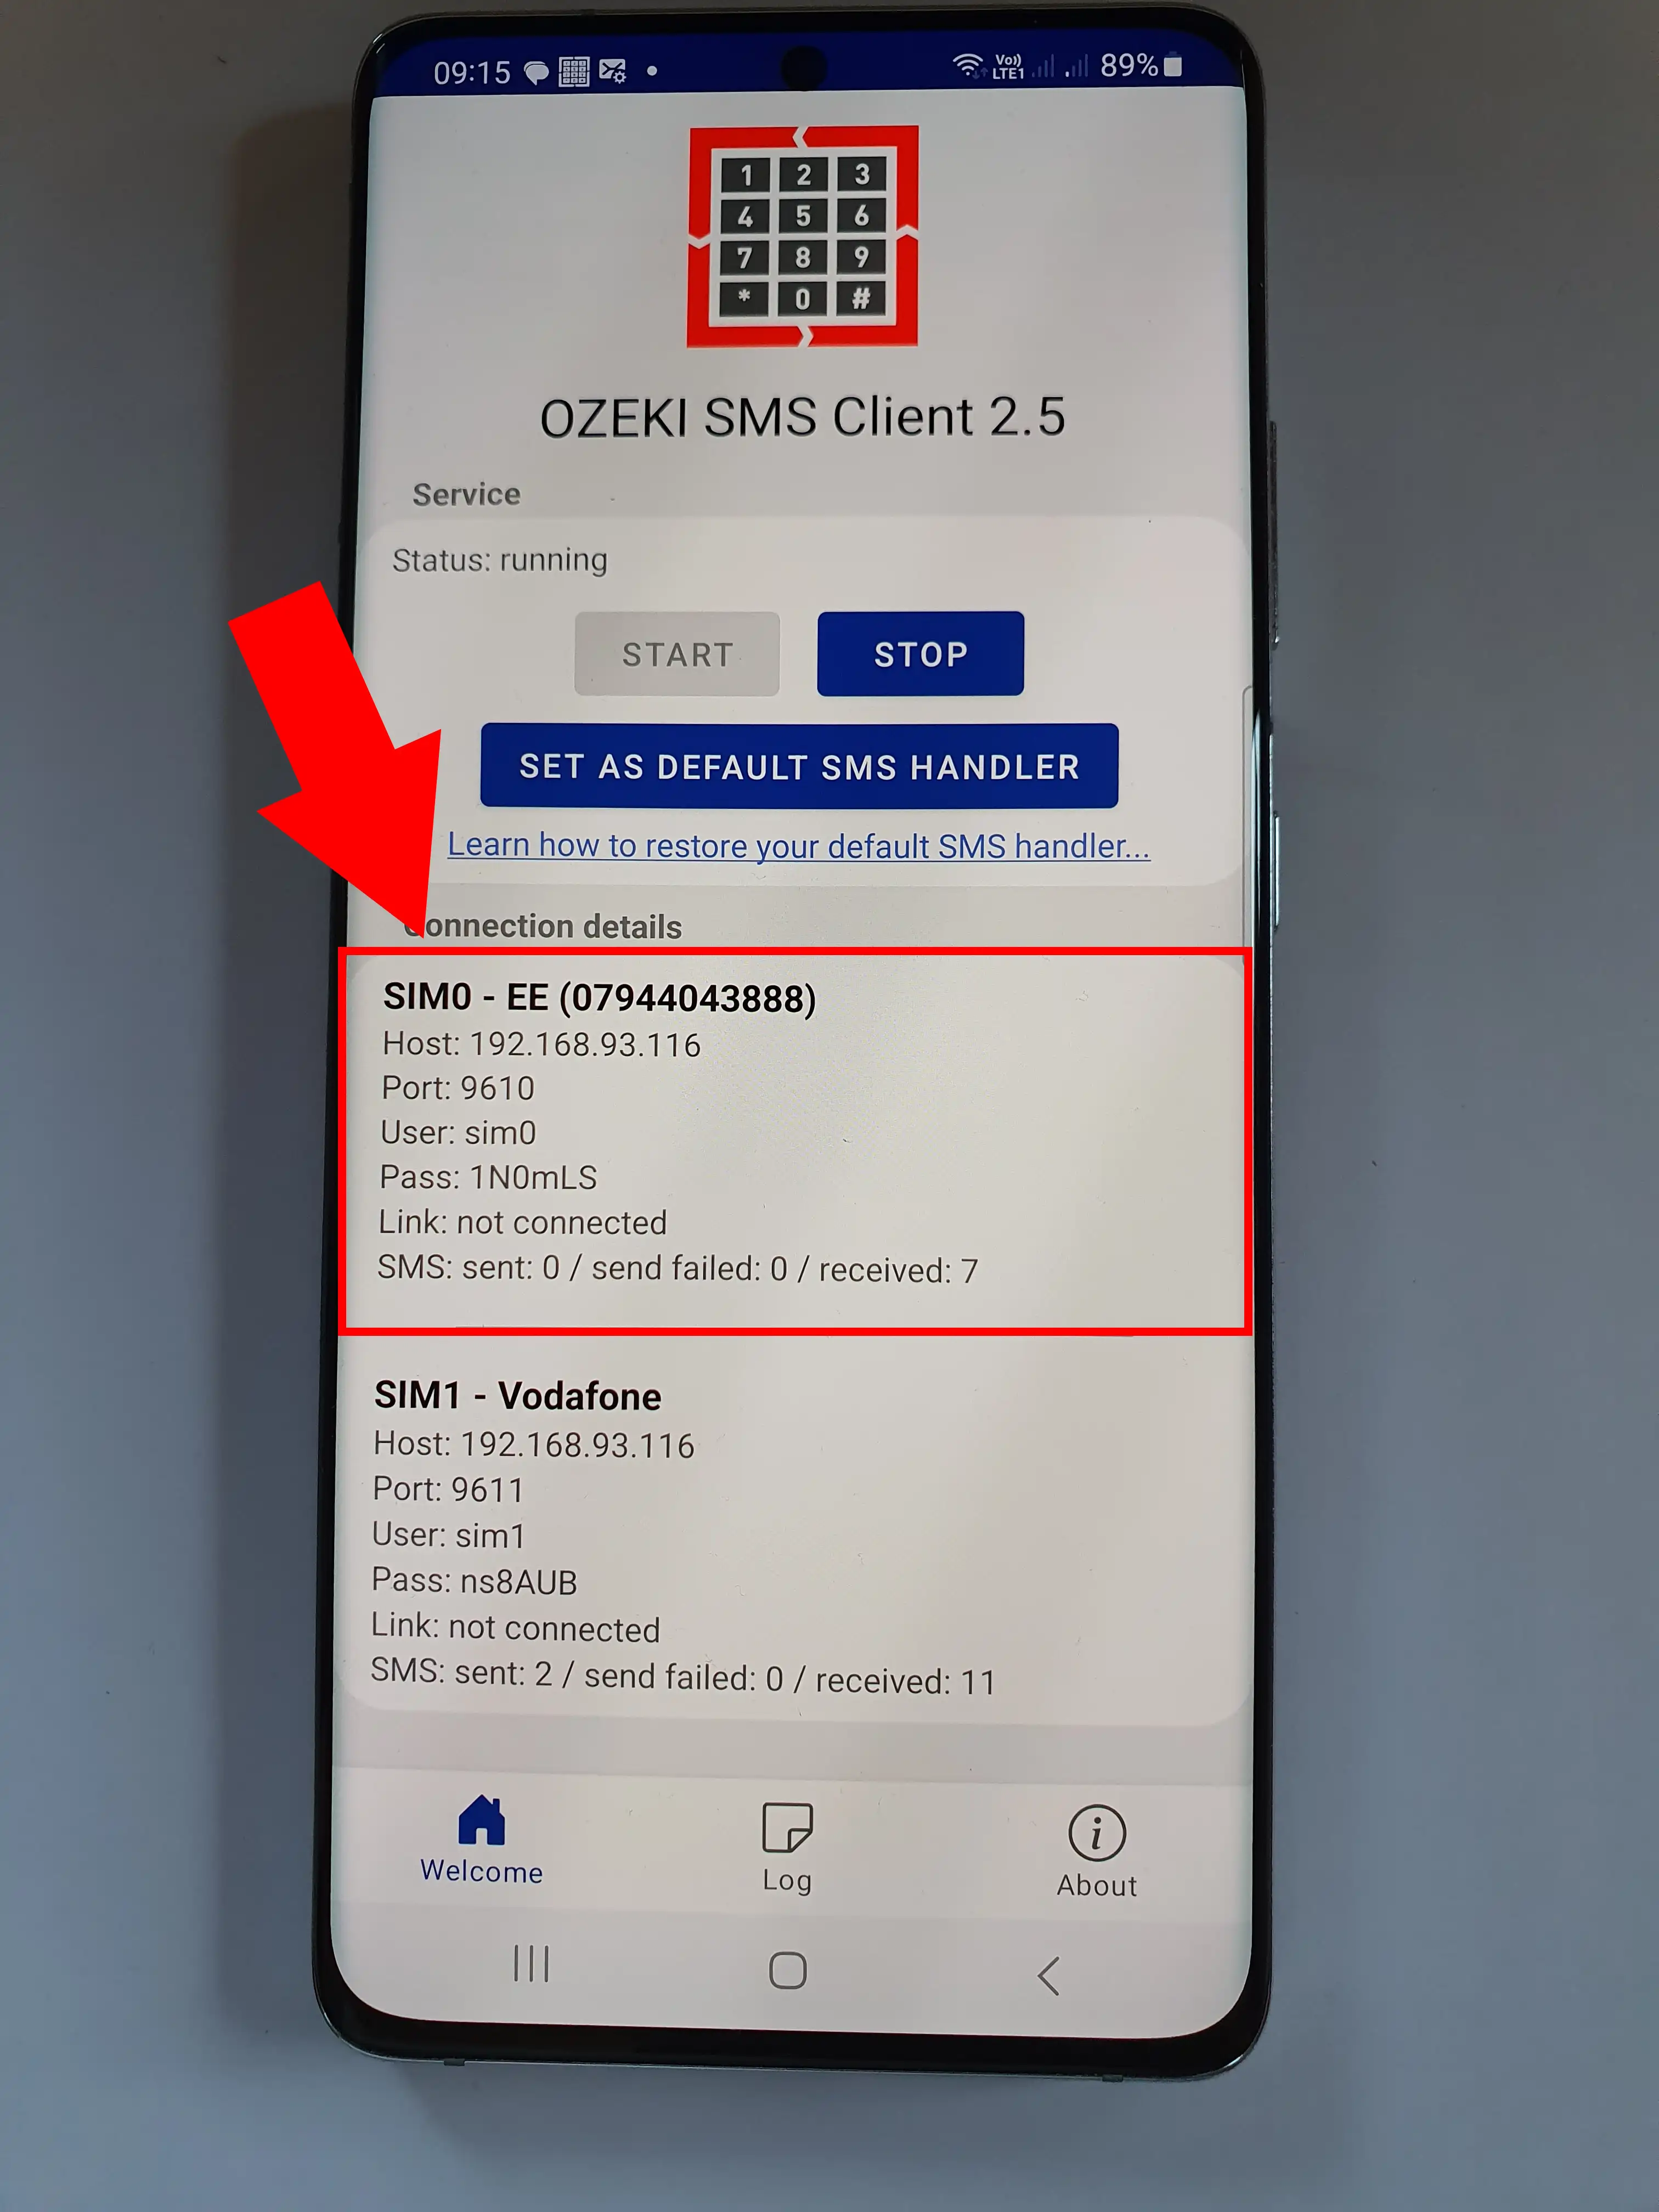
When the Ozeki SMS Client is running, it will show details of the connection to the SMS gateway (see Figure 11). This includes the following information:
- SIM card number - Service provider, in our case: SIM0 EE(07944043888)
- Host IP address, in our case: 192.168.93.116
- Port number, in our case: 9610
- Username, in our case: sim0
- Password in our case: 1N0mLS
- IP address of the linked device (if applicable), in our case: not connected
- Number of SMS messages sent, failed, and received, in our case: 0/0/7
Configure the SIM in Ozeki SMS Gateway on Windows (Video tutorial)
In this short under 1-minute video, we'll guide you step-by-step to connect the SMS gateway on your Windows PC to your Android phone.
From the moment you launch the application to the moment you achieve a successful connection, every step will be carefully explained and demonstrated.
We'll start the video without connections, we will add a new connection with the button on the left side menu that says 'Add new connection',
here we find the 'Android SMS client' section and click install, scroll down to the form that requires host, port, username, and password.
We fill the form with the right data (that can be found in Ozeki SMS Gateway Android app).
In our case the host will be 192.168.93.118
Port: 9610
Host: sim0
And the password will be inserted as well.
Afterward, we click the 'Ok' button at the bottom, it guides us to a new page where we establish the connection by clicking the connection slider in the left menu.
By watching this concise video, you'll effortlessly overcome any inconveniences related to the connection process,
ensuring a smooth and efficient experience with the setup of single SIM SMS gateway.
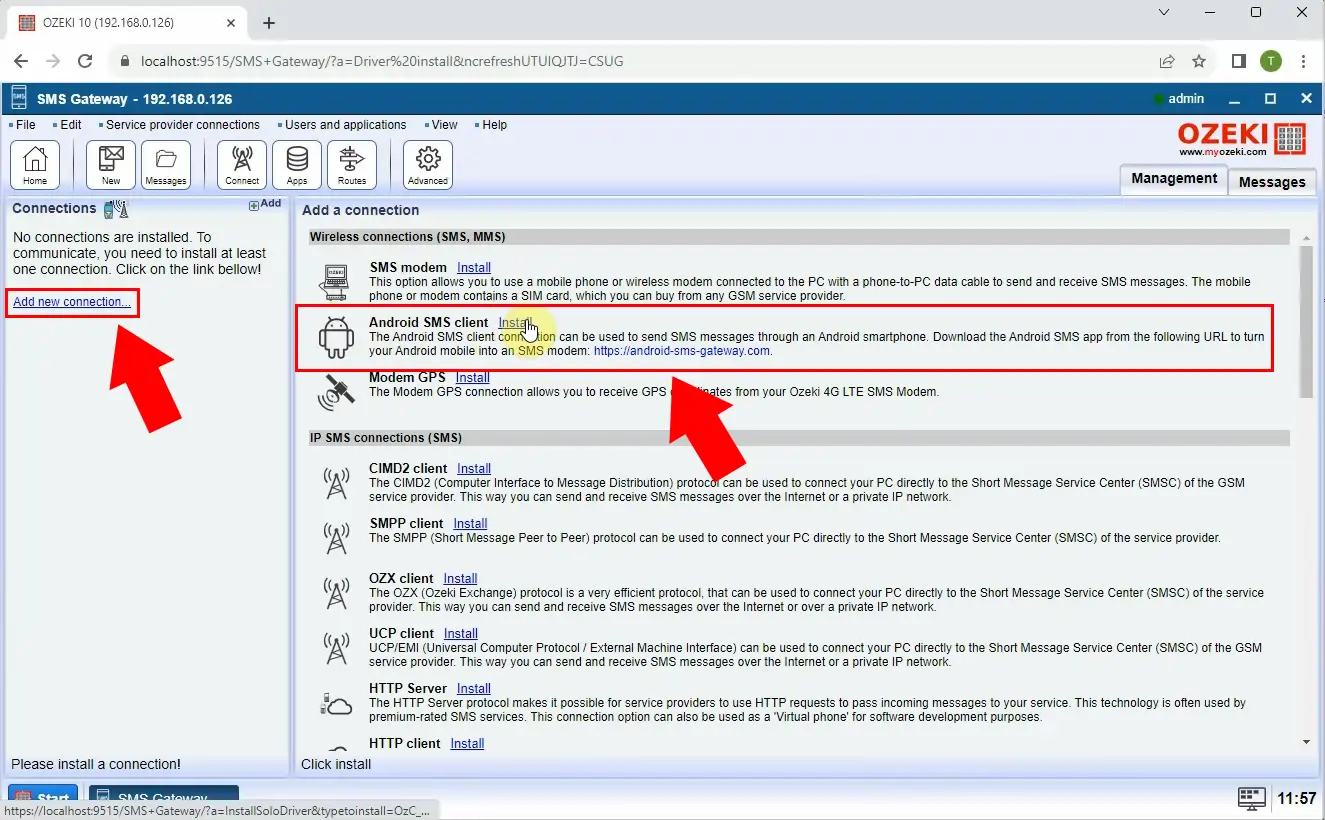
Step 1 - Add new connection
To establish a new connection, simply click on "Add new connection" located in the left menu bar (see Figure 12).
Before proceeding, ensure you have installed the Android SMS Client,
a crucial component that transforms your Android phone into an efficient SMS modem.
Once you've successfully completed this step, you'll gain access to the connection form.
This form is where you'll provide the necessary details to configure your connection accurately,
ensuring a seamless and reliable connection between your PC and your Android phone.
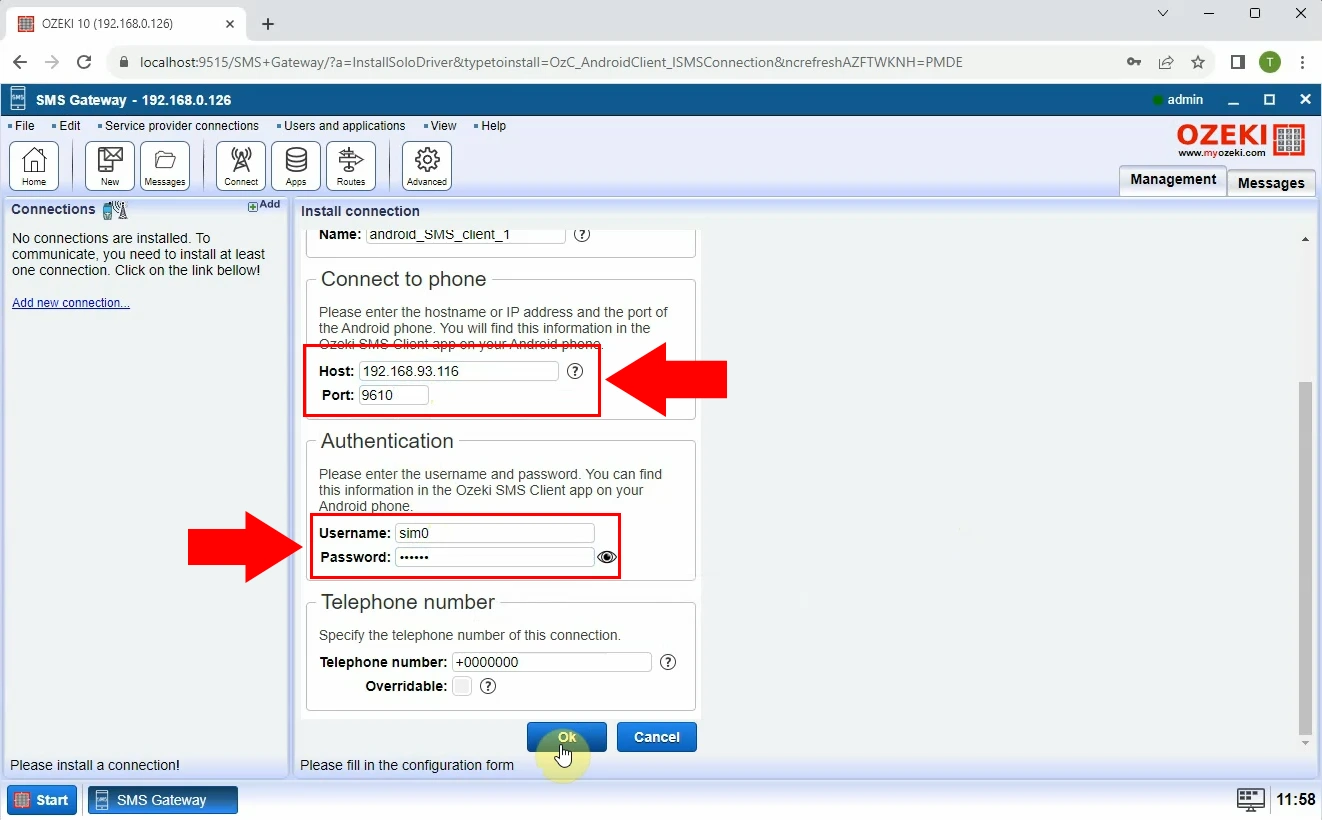
Step 2 - Configure connection details
Next, proceed to fill in the essential details in the host, port, username, and password boxes. You can easily obtain this information from the Android app on your phone. Once you've entered these details, click the "OK" button (see Figure 13). This action will establish a seamless connection, aligning your PC with your Android phone's specifications. With this connection in place, you'll unlock the full potential of Ozeki SMS Gateway, granting you access to a wide array of powerful features and functionalities.
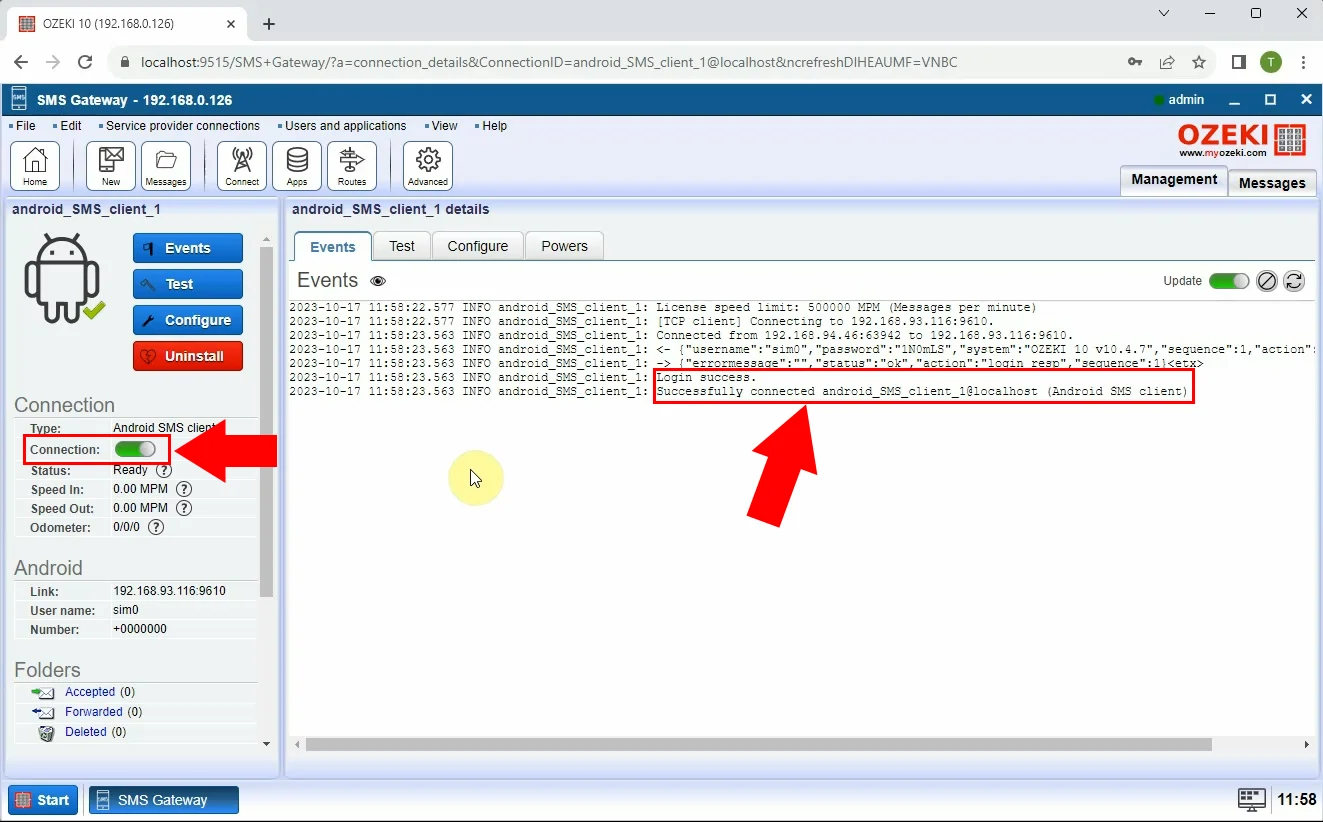
Successful connection
In the events tab, you can determine whether the connection with the phone was successful or not (see Figure 14). To disconnect the connection, simply click the slider in the left menu bar. Once you've established the connection, you are now ready to utilize Ozeki SMS Gateway, and all the necessary setup is complete.
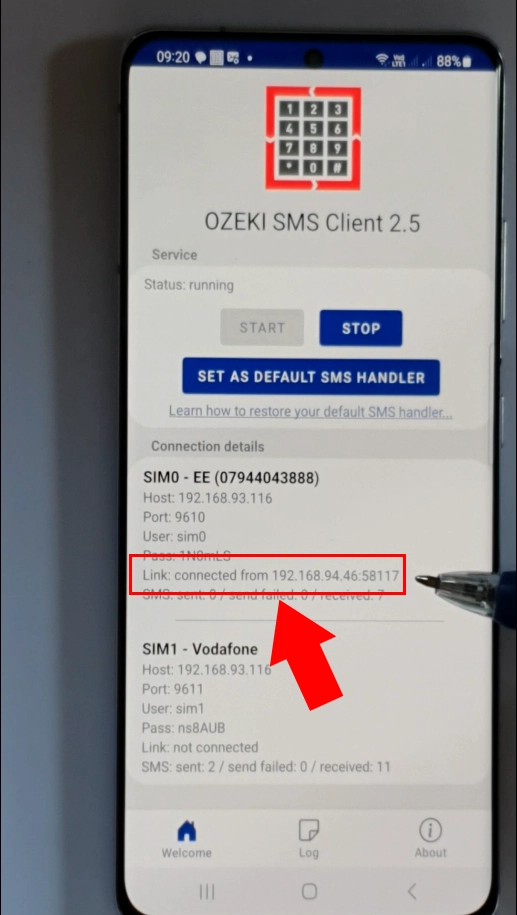
In this succinct video lasting less than 1 minute, you'll witness the seamless establishment of a connection between your Windows PC and Android phone. After completing the setup for the Android SMS gateway, this video becomes a valuable watch. By tuning in, you'll gain a clear understanding of the post-connection experience, ensuring you're well-prepared to make the most of your SMS gateway setup. In this video you can see how the connection becomes alive, see in the SIM0 Link section.
In the SIM0 box, you'll observe the live connection, complete with the Windows PC's IP address (see Figure 15).
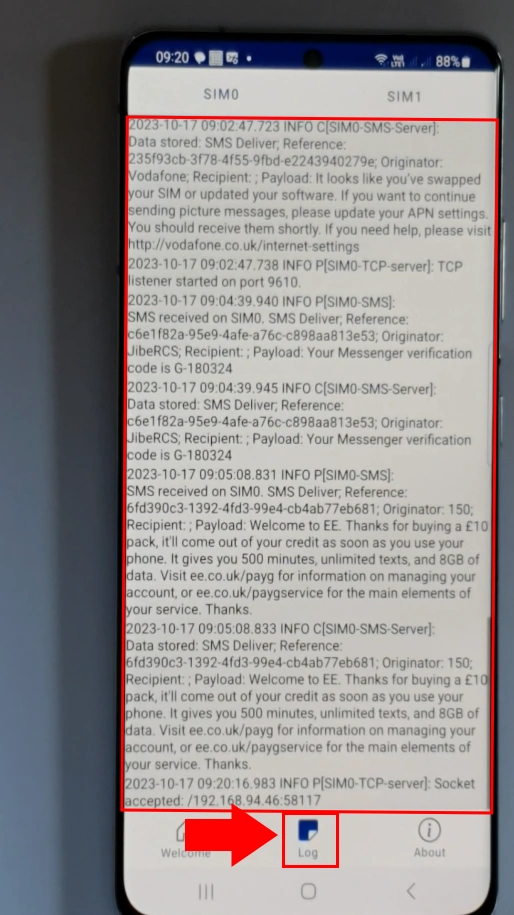
For a deeper insight, you can explore the "Log" section by tapping the Log button at the bottom, where you'll find comprehensive information regarding the connection (see Figure 16).
Send an SMS (Video tutorial)
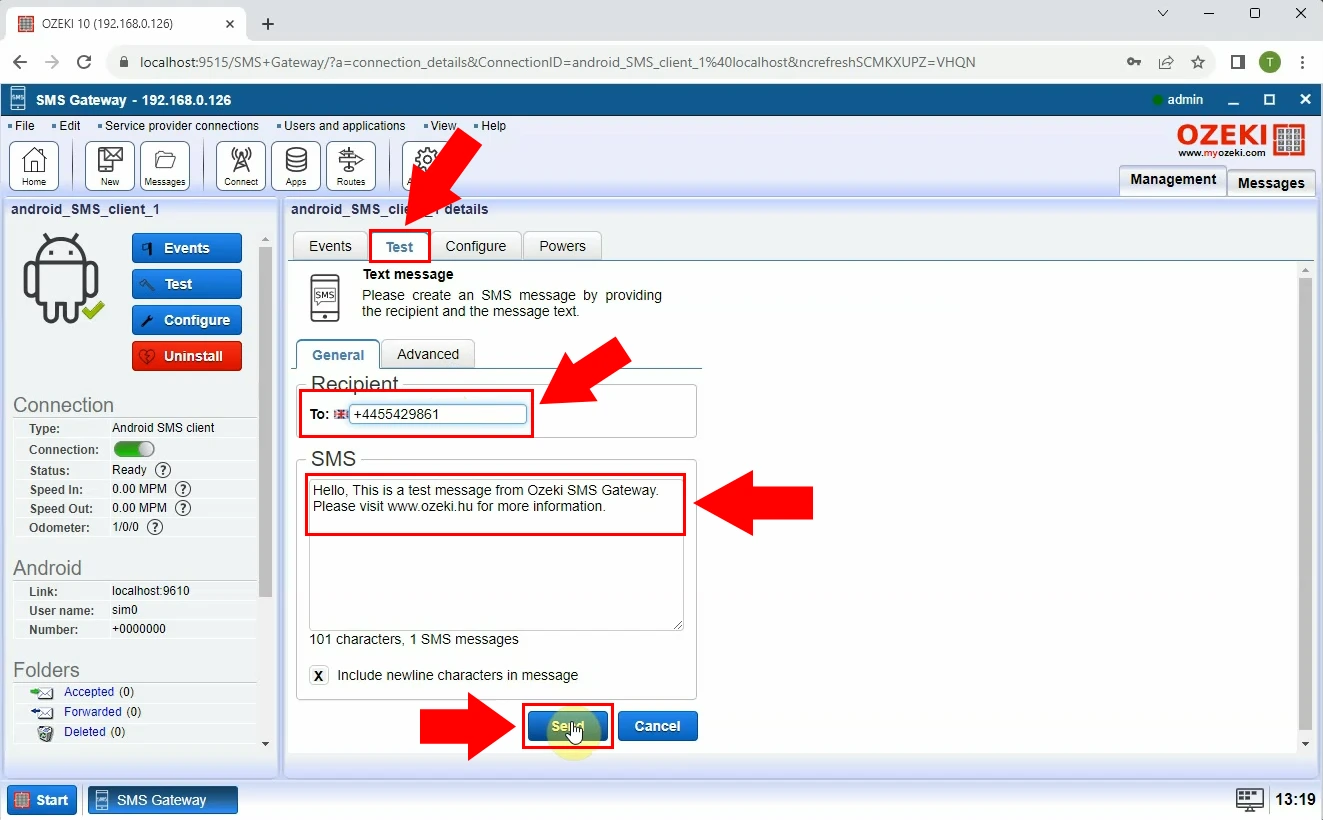
In this under 1-minute video, we'll demonstrate how to send an SMS from your Windows PC to your Android phone with Ozeki SMS Gateway. The connection is already established for a single SIM setup, so the video focuses on the process from composing your message to successfully sending it. First, we open the connection from the left menubar, here we select the Text tab. In this tab we fill in the form, Recipient is the phone number where we'd like to send the message. In this case, the phone number(recipient) is +4455429861. Under that there is the SMS section, here you can insert the message that you want to send. After filling out the form, we just click the Send button, and as you can see the program displays that the sending was successful. For more information, we open the Events tab where we can see all the data for the SMS message.
Step 1 - Open Android SMS Client connection
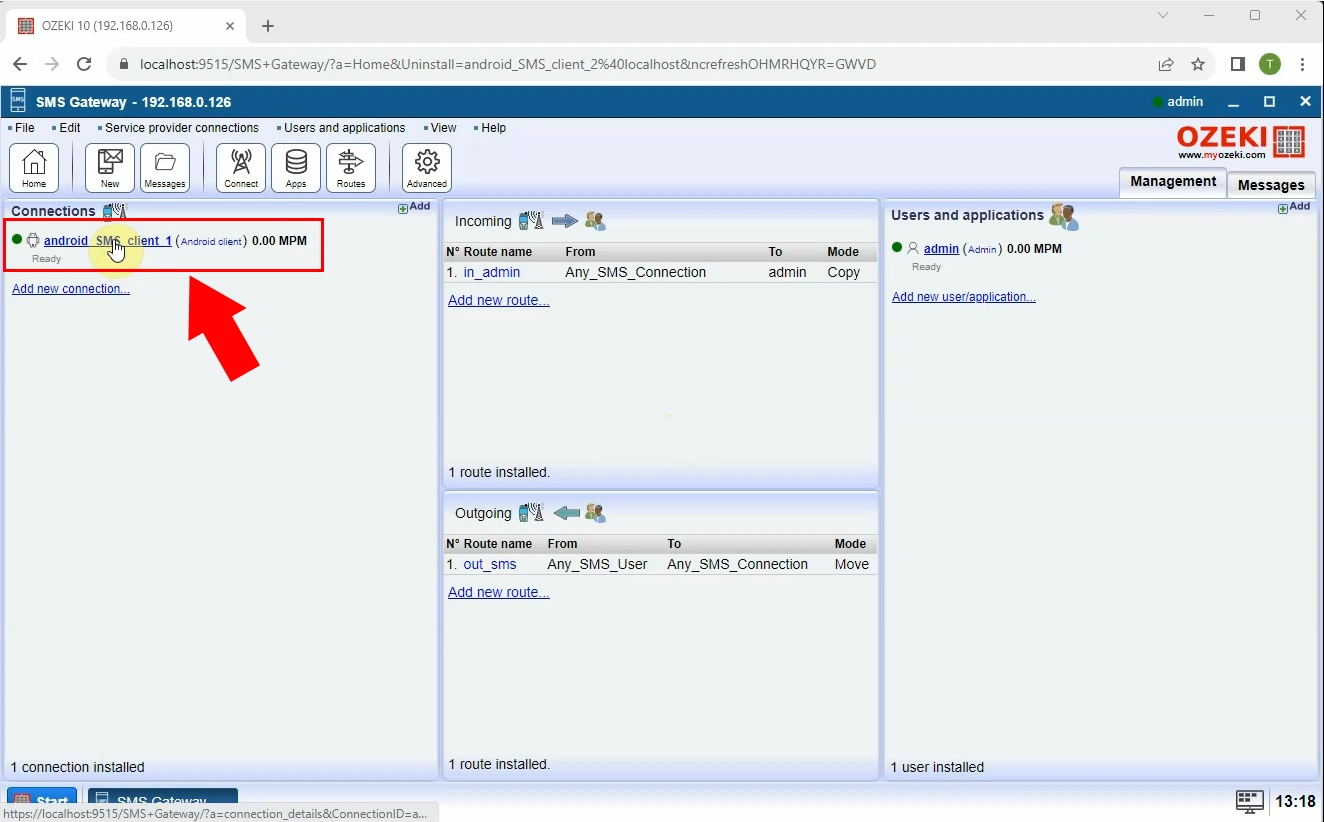
To send SMS messages from your Windows PC using the Ozeki Android SMS Client, start by selecting the available connection located conveniently in the left menu. (see Figure 17). This straightforward action will open up the comprehensive SMS gateway dashboard, granting you access to a multitude of powerful features and functionalities.
Step 2 - Send the SMS message
To send an SMS message via Ozeki SMS Gateway, start by clicking on "Text" in the top menu bar. Next, enter the recipient's phone number and compose your message in the provided text field. Once your message is ready, click "Send" (see Figure 18). Upon clicking "Send," the Ozeki SMS Gateway will work its magic, allowing you to transmit the SMS message from your Windows PC. What's unique about this process is that your Android phone serves as the sender, seamlessly bridging the gap between your computer and your mobile device. By following these simple steps, you can efficiently and conveniently send SMS messages, ensuring that your communication remains swift and effective.
SMS message has been sent successfully
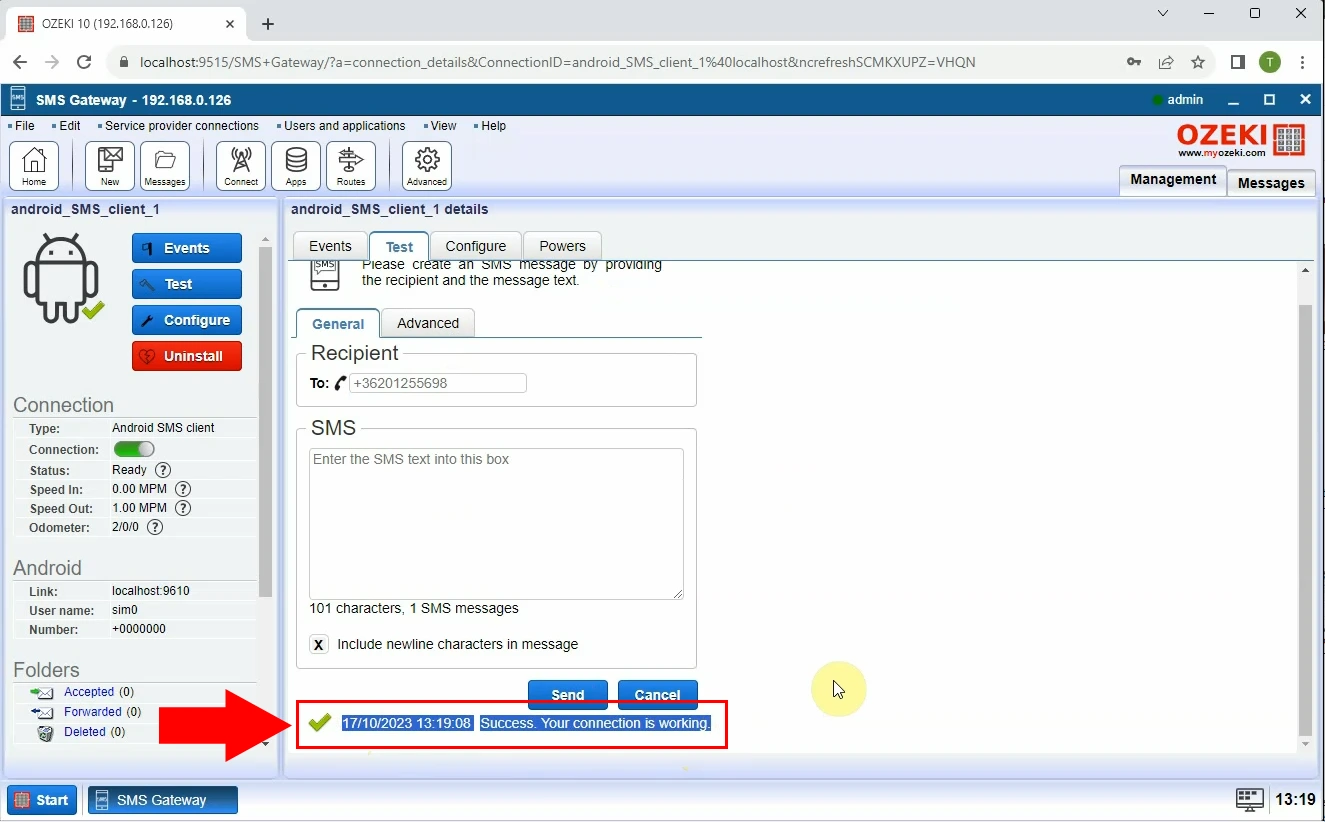
The screenshot shows a successful SMS message delivery notification from Ozeki SMS Gateway (see Figure 19). This notification is a confirmation that the message was successfully sent and received by the recipient's phone.
Message log
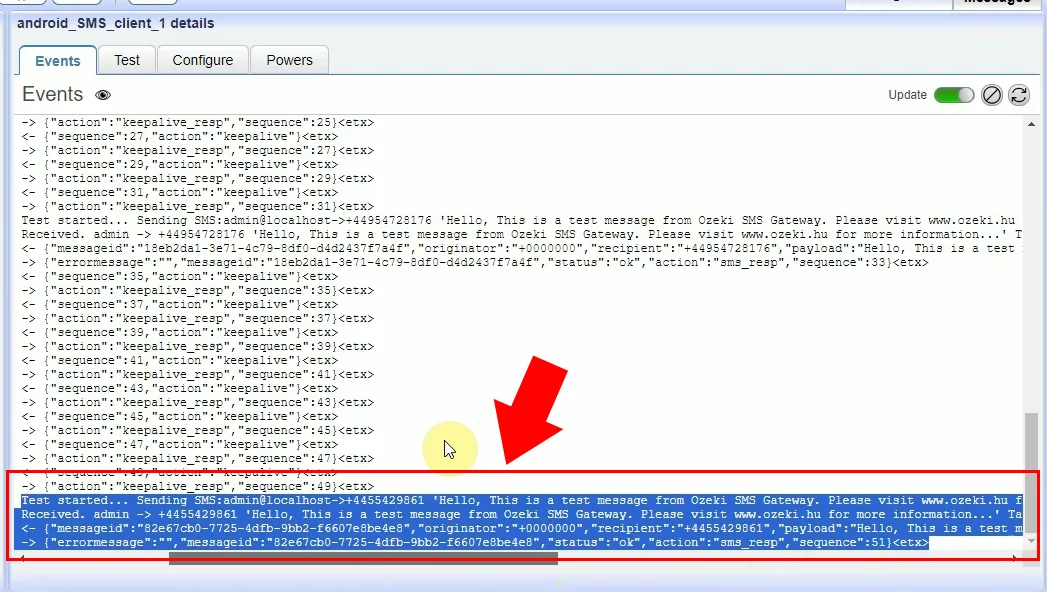
The screenshot shows the SMS log in Ozeki SMS Gateway. This log contains information about all SMS messages that have been sent and received using the gateway (see Figure 20). Viewing the SMS log can be useful for a variety of purposes, such as:
- Troubleshooting SMS delivery issues: If a user is having problems sending or receiving SMS messages, they can view the log to see if there are any errors or warnings.
- Tracking SMS usage: Users can view the log to see how many SMS messages they have sent and received over some time. This information can be used to track SMS usage and costs.
- Generating reports on SMS activity: Users can generate reports on SMS activity, such as the number of messages sent and received, the most popular recipients, and the most common message types. These reports can be used to improve SMS marketing campaigns and other SMS-based applications.
Conclusion
We've strived to simplify the process and guide you through every step with utmost ease.
You learned how to insert a SIM card into your phone, install Ozeki's Android Gateway app,setup SMS Gateway on Windows, and send SMS via this solution.
If you've closely followed these instructions, you should now be proficient in sending SMS messages using Ozeki Android SMS Gateway, without encountering any hitches.
Now, let's talk about the advantages of Ozeki Android SMS Gateway. With high-performance capabilities,
enabling speeds of up to 1000 SMS messages per second, and its remarkable reliability,
it can be managed with remarkable ease. Ozeki operates within an environment under your control,
ensuring the safety of your contact list and valuable data.
Moreover, Ozeki offers you the unique ability to route SMS messages across various endpoints while granting you control over your messages throughout their journey.
You can efficiently manage SMS costs and monitor your SMS traffic, as well as log SMS messages into a database,
offering comprehensive reporting capabilities to enhance your understanding of your SMS communication.
The versatility of Ozeki allows you to provide SMS services to your customers, employees, or business applications,
enabling you to supervise messaging activities effectively. Whether you're operating in your local area or abroad,
Ozeki works seamlessly in any country, facilitating SMS sending and receiving through diverse mobile connections.
Ozeki is an on-premises system, that guaranteeing excellent data protection, a crucial aspect of modern communication security.
For a brighter future in SMS communication, harness the power of Ozeki SMS Gateway.
To learn more about the advantages of Ozeki and explore similar solutions, please visit ozeki-sms-gateway.com.
Don't miss this opportunity to enhance your SMS capabilities and take control of your communication.
Join us in harnessing the potential of Ozeki SMS Gateway and start sending messages more efficiently and securely today!
